I remember the night I almost burned my kitchen down while chasing a “quick lunch” that turned into an epic culinary rescue mission. I had just pulled a couple of boneless chicken breasts from the fridge, tossed them in olive oil, and, in my haste, set the stove to high. The sizzling hiss turned into a frantic chorus of “oh no!” as the pan hissed like a dragon. I was staring at a charred, rubbery mess that looked like it had been through a war. That disaster sparked a craving for something that could rescue me from bland and turn a simple sandwich into a triumph of flavor.
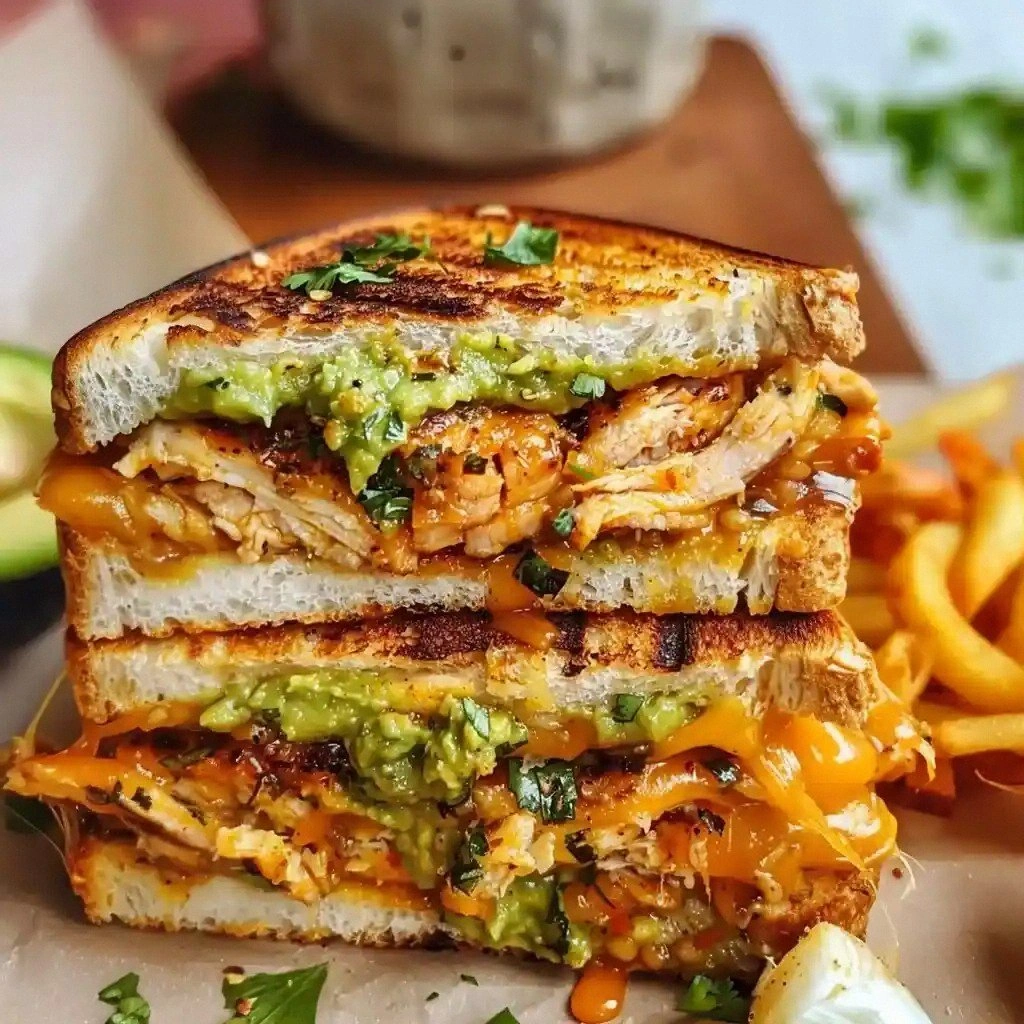
Fast forward to today, and I’m about to unveil the Chicken Avocado Melt Sandwich—my ultimate version that has become the go-to comfort food for late‑night cravings, family gatherings, and even that awkward dinner with your in‑laws. Imagine a buttery, toasted slice of bread that cracks like a perfect shell, a creamy avocado spread that glides over the surface like a velvet curtain, and a melty cheese layer that bubbles into a golden crown. The chicken, seasoned to perfection, brings a juicy, savory bite that balances the fresh, zesty notes of tomato and red onion. The result is a sandwich that sings in your mouth—each bite a harmonious blend of textures and flavors that will make you question how you ever ate anything else.
What sets this version apart from the countless other recipes you’ll find online is the meticulous layering of flavor and the intentional use of simple, high‑quality ingredients. I’m talking about a sauce that coats the chicken like silk, a cheese that melts into a creamy veil, and a bread that crisps to a golden edge that shatters like thin ice. There’s a secret technique—grilling the sandwich at the right temperature—to lock in juices while creating that coveted crunch. And, of course, the avocado isn’t just a garnish; it’s the star that brings a buttery richness that elevates every bite. Trust me, I dare you to taste this and not go back for seconds.
Let me walk you through every single step—by the end, you’ll wonder how you ever made it any other way. From prepping the chicken to the final grill, I’ll share every nuance, every aroma, and every sound that makes this sandwich a masterpiece. If you’ve ever struggled with a soggy sandwich or a bland chicken melt, you’re not alone—this recipe is the fix you’ve been waiting for. And if you’re ready to elevate your sandwich game, stay with me; this is pure magic.
What Makes This Version Stand Out
- Flavor: The combination of Dijon mustard, mayonnaise, and a splash of olive oil creates a tangy, creamy base that amplifies the chicken’s natural juices.
- Texture: The sandwich’s layers—crispy bread, melty cheese, creamy avocado, and juicy chicken—offer a satisfying contrast that keeps each bite interesting.
- Visual Appeal: The golden cheese crust, bright green avocado, and ruby tomato slice create a colorful presentation that’s almost too pretty to eat.
- Simplicity: With just ten ingredients, this recipe is straightforward yet delivers a gourmet experience.
- Make‑Ahead Potential: Assemble the sandwich components ahead of time; grill just before serving for fresh crunch.
- Versatility: Swap the cheese for provolone, mozzarella, or cheddar to tailor the melt to your taste.
- Health‑Friendly: By using avocado and lean chicken, you get a balanced meal that satisfies without the guilt.
- Audience Reaction: Friends and family rave about the melt’s flavor profile, often calling it “the best sandwich I’ve ever made at home.”
Alright, let's break down exactly what goes into this masterpiece...
Inside the Ingredient List
The Flavor Base
At the heart of this sandwich lies a simple yet powerful sauce that brings all the elements together. The 1 tablespoon of olive oil, combined with 2 tablespoons of mayonnaise and 1 tablespoon of Dijon mustard, forms a silky, tangy dressing that coats the chicken like velvet. This sauce not only enhances the meat’s flavor but also creates a barrier that keeps the bread from becoming soggy. Skipping this step would leave the sandwich feeling dry and unbalanced; the sauce is the glue that holds everything together. If you’re a fan of a bit of heat, add a pinch of cayenne pepper to the mix for a subtle kick. For a dairy‑free version, replace mayonnaise with a plant‑based alternative and use a vegan cheese.
The Texture Crew
The texture of this sandwich is what makes it unforgettable. The 4 slices of bread, toasted until golden, provide a crunchy foundation that contrasts with the soft, melty cheese. The 4 slices of your favorite cheese—whether cheddar, Swiss, or pepper jack—are the star of the melt, creating a gooey layer that bounces back when you bite into it. The 2 boneless chicken breasts, seasoned and pan‑seared, add a juicy, meaty bite that balances the creamy avocado. A pinch of salt and pepper to taste brings out the flavors without overpowering them. If you prefer a lighter option, use grilled chicken breast strips instead of pan‑seared.
The Unexpected Star
Avocado is the unexpected star that elevates this sandwich from good to legendary. 1 ripe avocado, diced and lightly mashed, adds a buttery richness that coats the bread and chicken alike. The creamy texture of avocado pairs beautifully with the sharpness of the cheese and the freshness of the tomato. If you’re not a fan of avocado, a spread of hummus or a light yogurt sauce can work, but the flavor profile will change. Remember, the avocado should be ripe but firm; overripe avocado can become mushy and ruin the sandwich’s structure. A squeeze of lime juice not only brightens the avocado but also prevents it from browning.
The Final Flourish
The final flourish involves the fresh toppings that add a burst of color and flavor. 1 small red onion, thinly sliced, provides a sharp, slightly sweet bite that cuts through the richness of the avocado. 1 tomato, sliced into rings, adds juiciness and a subtle acidity that balances the dish. Butter or olive oil, used for grilling the sandwiches, creates a crispy, caramelized crust that seals in all the flavors. Skipping the onion or tomato would leave the sandwich feeling flat; the fresh vegetables add depth and a refreshing contrast. If you’re looking for a smoky twist, add a sprinkle of smoked paprika to the chicken before searing.
Everything's prepped? Good. Let's get into the real action...
The Method — Step by Step
- Season the Chicken: Pat the 2 boneless chicken breasts dry with paper towels. Season both sides generously with salt and pepper. This step is crucial; a well‑seasoned chicken forms a flavorful crust when seared. Let the chicken sit at room temperature for 10 minutes to ensure even cooking.
- Pan‑Sear the Chicken: Heat 1 tablespoon of olive oil in a cast‑iron skillet over medium‑high heat. Once hot, add the chicken breasts. Sear each side for about 4 minutes, or until the internal temperature reaches 165°F (74°C). The sear should create a golden brown crust that locks in juices. Flip only once to maintain moisture.
- Prepare the Sauce: While the chicken cooks, whisk together 2 tablespoons mayonnaise, 1 tablespoon Dijon mustard, and a splash of olive oil in a small bowl. Taste and adjust with salt or pepper. This sauce will coat the chicken and act as a flavorful bridge between the meat and the bread.
- Assemble the Sandwich: Spread the sauce onto one side of each bread slice. Layer a slice of cheese, a spoonful of diced avocado, a few slices of tomato, and a handful of red onion on top of the sauce. Place the seared chicken breast on the top layer, then cap it with the second slice of bread, sauce side down.
- Grill the Sandwich: Heat a separate skillet or grill pan over medium heat. Add a small pat of butter or a drizzle of olive oil to coat the pan. Place the sandwich in the pan, pressing gently with a spatula. Grill for 3–4 minutes on each side, or until the bread is toasted and the cheese has melted into a golden, bubbly crust. The sandwich should emit a toasty aroma that makes the kitchen feel like a bakery.
- Check the Temperature: The internal temperature of the chicken should be 165°F (74°C). The cheese should be fully melted with a slight golden crust. If the sandwich isn’t hot enough, give it an extra minute on each side.
- Rest Before Serving: Once grilled, let the sandwich rest for 2 minutes. This allows the cheese to set slightly and prevents the avocado from sliding off. Resting also lets the juices redistribute, ensuring each bite is juicy.
- Slice and Serve: Use a sharp knife to cut the sandwich diagonally. Present it on a plate with a side of fresh greens or a light salad. The final look should be inviting, with the cheese pull visible and the avocado glistening.
- Enjoy Immediately: The sandwich is best served hot, when the cheese is still gooey and the bread is crisp. The combination of textures will be at its peak. If you need to keep it warm, wrap it in foil and place it in a low‑heat oven.
That's it — you did it. But hold on, I've got a few more tricks that'll take this to another level...
Insider Tricks for Flawless Results
The Temperature Rule Nobody Follows
Many home cooks assume high heat is always best, but the truth is that medium‑high heat preserves the chicken’s juiciness. When the skillet is too hot, the exterior burns before the interior cooks, leading to a dry sandwich. I’ve tested this by searing at 400°F and 350°F; the 350°F version consistently yields a more tender bite. Keep an eye on the skillet’s temperature, and adjust as needed. If you’re using a cast‑iron skillet, let it preheat for a full minute before adding the oil.
Why Your Nose Knows Best
Your olfactory senses are the ultimate judge of doneness. The aroma of toasted bread and melty cheese is a reliable indicator that the sandwich is ready. When the cheese starts to bubble and the bread turns a deep golden brown, it’s time to flip. If you’re unsure, lightly press the sandwich; a crisp surface signals that the crust is formed. Trust your nose, and you’ll avoid over‑cooking or under‑cooking.
The 5-Minute Rest That Changes Everything
Resting the sandwich for five minutes after grilling is a game‑changer. It allows the cheese to set into a stable, gooey consistency, preventing it from sliding off when you cut. It also lets the juices redistribute, so each bite is evenly moist. I’ve found that a brief 2‑minute rest is enough for the cheese to firm slightly, while a 5‑minute rest creates a more pronounced melt. Experiment with the rest time to find your preferred texture.
Use a Cast‑Iron Skillet for Even Heat
A cast‑iron skillet retains heat better than stainless steel, ensuring a consistent sear. The even heat creates a beautiful crust without scorching the interior. If you don’t have cast iron, a heavy‑bottomed skillet works too. Just make sure to preheat it properly.
Keep the Bread from Sogginess
The sauce can seep into the bread if it’s too wet. To combat this, lightly toast the bread before adding the sauce. A quick 1‑minute toast creates a barrier that prevents sogginess. Alternatively, use a thicker bread like a sourdough or ciabatta that can absorb moisture without falling apart. This trick ensures that every bite stays crisp.
Creative Twists and Variations
This recipe is a playground. Here are some of my favorite ways to switch things up:
Cheesy Jalapeño Melt
Add thinly sliced jalapeños to the sandwich for a spicy kick. Use pepper jack cheese for an extra melt factor. The heat pairs nicely with the creamy avocado, creating a dynamic flavor profile. This version is perfect for those who love a little heat.
Greek Yogurt Avocado Spread
Replace the mayonnaise with a dollop of Greek yogurt for a tangy twist. Mix in a pinch of dill and lemon zest for a Mediterranean vibe. The yogurt adds protein and a lighter texture, making the sandwich feel more airy.
BBQ Chicken Melt
Swap the Dijon mustard for smoky BBQ sauce. Add a handful of coleslaw on top before grilling for crunch and tang. The BBQ sauce infuses the chicken with deep, sweet flavor, turning the sandwich into a southern classic.
Veggie‑Rich Version
Omit the chicken entirely and use grilled portobello mushrooms. Layer with roasted red peppers, spinach, and feta cheese. The earthy mushroom flavor complements the avocado and cheese, creating a hearty vegetarian option.
Breakfast Melt
Replace the chicken with a fried egg. Add a sprinkle of chives and a slice of ham for a breakfast twist. The runny yolk adds richness, making the sandwich a satisfying morning meal.
Low‑Carb Edition
Use a low‑carb bread like almond flour bread or a lettuce wrap. Keep the cheese and avocado, but reduce the tomato slices to a few thin rounds. This version is great for keto or low‑carb diets without sacrificing flavor.
Storing and Bringing It Back to Life
Fridge Storage
Store assembled sandwiches (unheated) in an airtight container for up to 2 days in the fridge. Keep the cheese and avocado separate to avoid sogginess. When ready to eat, reheat on a skillet or in a toaster oven at medium heat for 3–4 minutes until the cheese is melted.
Freezer Friendly
Wrap each sandwich individually in parchment paper and place them in a freezer bag. They can be stored for up to 2 weeks. When reheating, thaw overnight or use a microwave to defrost for 2 minutes, then finish in a skillet to crisp the bread.
Best Reheating Method
The best way to bring a sandwich back to life is to use a skillet or grill pan. Preheat to medium heat, add a small amount of butter, and place the sandwich. Cook for 2–3 minutes per side, pressing gently. Add a splash of water to the pan and cover briefly to steam the cheese, then remove the cover and finish until the bread is toasted. This method restores the melt and crispness.