I burned through three bags of peaches before I cracked the code. The first batch turned into a soggy, jammy mess that tasted like disappointment with a side of crust. The second batch? Let's just say my neighbor's dog wouldn't even sniff it. But on that third attempt, when the butter hit the hot pan and the peaches started singing their caramelized song, I knew I had stumbled onto something magical. These summer peach bars aren't just another fruit dessert — they're the reason you'll find me hovering at farmers' markets at dawn, elbow-deep in peach crates, muttering about sugar ratios like a mad scientist.
Picture this: it's 7 AM on a Saturday, and I'm standing in my kitchen in pajama pants covered in flour, the morning light filtering through the window as peaches simmer on the stove. The scent hits you first — that intoxicating blend of vanilla, butter, and fruit that makes you close your eyes involuntarily. Your neighbors will knock. Your family will materialize from thin air. And you'll find yourself making these bars every single weekend until peach season ends, because once you taste the real deal, there's no going back to those sad, gummy grocery store versions.
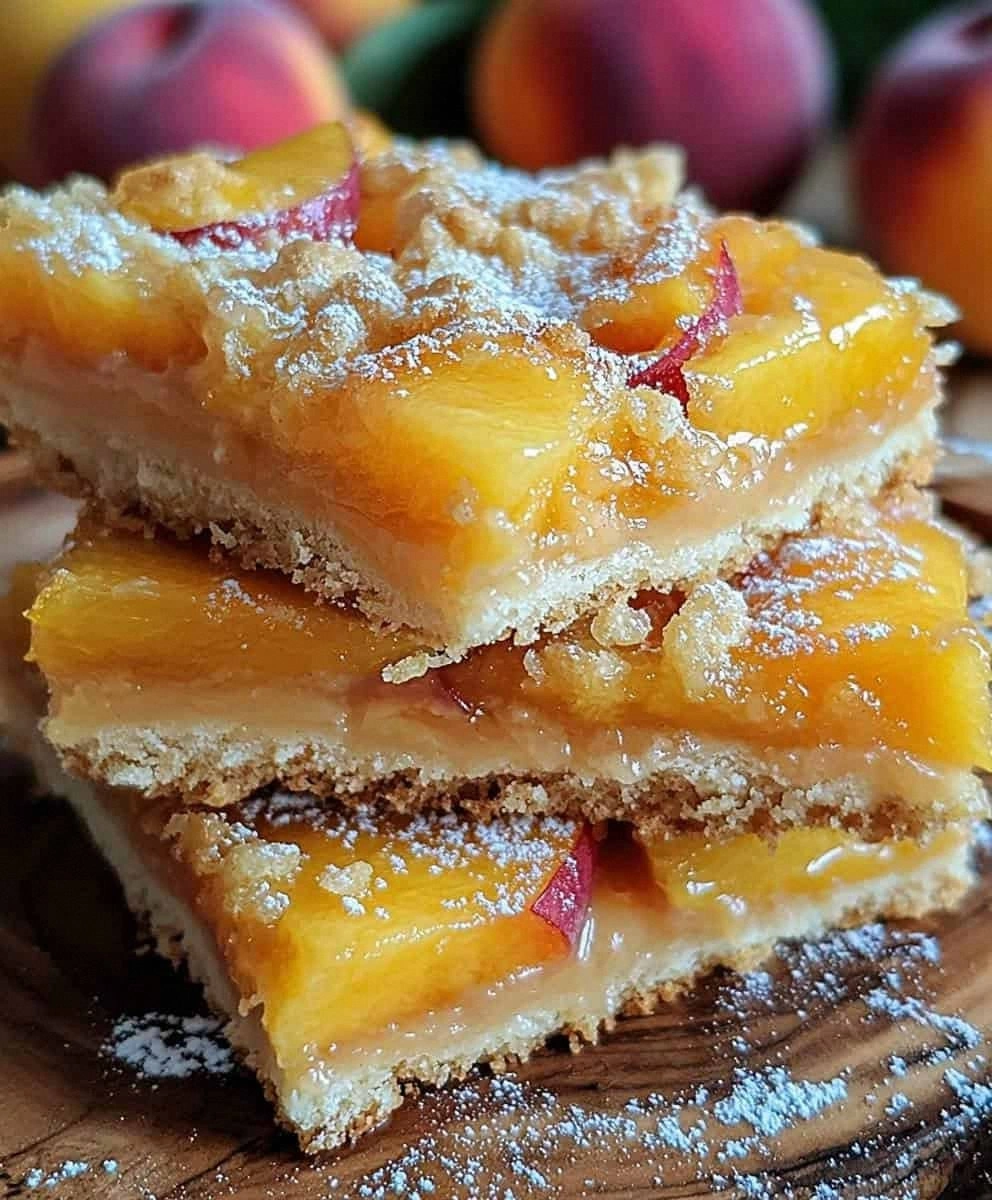
Here's the thing about most peach bar recipes: they treat the fruit like an afterthought, dumping canned filling between layers of cardboard-dry crust. They get everything wrong — the texture, the balance, the very soul of what makes peaches worth celebrating. This version? It's the peach bar equivalent of finding the perfect vintage band t-shirt at a thrift store — unexpected, life-changing, and you'll want to tell everyone about it. We're talking about a crust that shatters like thin ice before giving way to a custardy peach filling that's somehow both jammy and bright, topped with a crumble that'll make you question why you ever ate anything else.
I'll be honest with you — I ate half the pan before my husband even knew they existed. I told him the recipe only made six servings when it actually makes twelve. I hid them behind the quinoa in the pantry. These bars will make you do questionable things, but trust me, they're worth every sneaky midnight kitchen trip. Let me walk you through every single step — by the end, you'll wonder how you ever made it any other way.
What Makes This Version Stand Out
Butter-Forward: While other recipes skimp on the good stuff, we're using a full cup of butter between the crust and crumble. This isn't the time for restraint — rich, flaky layers are the foundation of everything good in life, and these bars understand that assignment completely.
Fresh Fruit Philosophy: Canned peaches are a crime against dessert. We're using perfectly ripe, seasonal peaches that we gently cook down to concentrate their flavor without turning them to mush. The difference is like comparing a sunset to a flashlight.
Texture Tango: Most bars are either all mush or all crunch. Ours delivers a symphony — the shattering crust, the jammy but still intact fruit, the buttery crumble that melts on your tongue. It's a three-act play in every bite.
Make-Ahead Magic: These bars actually improve overnight as the flavors meld and deepen. Make them on Sunday, and you'll have breakfast sorted through Wednesday (if they last that long, which they won't).
Beginner-Friendly Brilliance: No fancy equipment, no terrifying techniques, no ingredients you can't pronounce. If you can use a cheese grater and set a timer, you can master these bars. I've taught this recipe to my eight-year-old nephew with zero casualties.
Crowd Psychology: Bring these to any gathering and watch grown adults lose their composure. I've seen people hide them in purses, lie about dietary restrictions, and straight-up cut in line. They're that good.
Seasonal Flexibility: While peaches are the star, this framework works with any stone fruit. Swap in nectarines in late summer, plums in early fall, or even berries when you're feeling rebellious. The method stays bulletproof.
Breakfast Justification: With fruit, oats, and butter (dairy, right?), these practically count as a balanced meal. Don't let anyone shame you for eating them at 8 AM. They're basically a fruit tart in bar form, and that's just responsible eating.
Alright, let's break down exactly what goes into this masterpiece...
Inside the Ingredient List
The Flavor Base: Peaches and Company
The peaches matter more than anything else here. You want them ripe but not mushy — they should give slightly when pressed but still hold their shape. Underripe peaches will stay stubbornly tart even after cooking, while overripe ones dissolve into baby food. Look for fruit that smells intensely peachy at the stem end, with unblemished skin that blushes from yellow to orange. If you can only find rock-hard peaches, buy them four days before you plan to bake and let them ripen in a paper bag with a banana. The ethylene gas works like a charm, and you'll feel like a produce wizard.
Granulated sugar does more than sweeten — it helps draw out the peaches' natural juices, creating a glossy syrup that coats every slice. Don't reduce the sugar thinking you're being virtuous; you'll end up with sad, weeping fruit and a soggy crust. The lemon juice brightens everything, cutting through the richness like a squeeze of sunshine. It also helps the peaches maintain their gorgeous color instead of turning that unappetizing brown-gray that makes them look like they've given up on life.
The Texture Crew: Building Structure
All-purpose flour forms the backbone of both the crust and crumble, but here's the secret — we use slightly different ratios for each. The crust gets less flour relative to butter, making it tender and cookie-like rather than bread-y. The crumble needs more structure to create those addictive chunky bits that you'll pick off the top when you think nobody's looking (they are, but they understand). Cornstarch is our insurance policy against watery filling, creating a silky gel that holds everything together without that weird, gluey texture that too much thickener causes.
Cold butter is non-negotiable. Warm butter melts into the flour, creating a greasy, dense crust that tastes like disappointment. Cold butter stays separate, creating little pockets of steam as it bakes, which translates to flaky, tender layers that shatter beautifully under your fork. If your kitchen is warm, pop the butter in the freezer for 10 minutes before you start. Your future self will thank you when you're eating these bars instead of crying over a tough crust.
The Unexpected Star: Spices and Oats
Cinnamon and nutmeg are the supporting actors that make peaches sing louder. Just a whisper of each enhances the fruit's natural flavor without announcing themselves. Too much and you'll taste potpourri; too little and the peaches taste flat and one-dimensional. The rolled oats in the crumble aren't just for health-washing — they provide nubbly texture and a subtle nuttiness that plays beautifully against the sweet fruit. Use old-fashioned oats, not quick-cooking, which turn to mush and make your crumble sad and pasty.
The Final Flourish: Serving Essentials
Powdered sugar for dusting isn't just pretty — it adds a whisper of sweetness and makes the bars look like they came from a bakery instead of your kitchen. A little goes a long way; you're not trying to recreate a snowstorm. And while vanilla ice cream isn't technically part of the recipe, serving these bars warm with a melting scoop on top should be illegal in the best possible way. The contrast of hot and cold, the way the ice cream pools into the crevices of the crumble, the way it cuts through the richness — it's not optional, it's destiny.
Everything's prepped? Good. Let's get into the real action...

The Method — Step by Step
- Start with the crust because it needs time to chill while you prep everything else. In your food processor, pulse the flour, sugar, and salt just to combine — about three quick pulses. Add the cold, cubed butter and pulse until you have pea-sized pieces. Some recipes tell you to process until it looks like sand, but that's how you get tough crust. You want visible butter pieces; they'll create the flaky layers that make people close their eyes when they take the first bite. Drizzle in the ice water one tablespoon at a time, pulsing between additions. Stop as soon as the dough starts to clump — it'll look too dry, but trust the process.
- Dump the shaggy dough onto a sheet of plastic wrap. Use the wrap to press it into a rough rectangle about 1/2-inch thick. Don't touch it with your warm hands more than necessary — we're keeping things cold here. Wrap it up and refrigerate for at least 30 minutes while you move on to the peaches. This resting time lets the gluten relax and the butter firm up, which means no shrinking or tough crust later. Use this time to prep your baking pan and start the filling.
- While the crust chills, peel and slice your peaches. The easiest way to peel them is to score an X in the bottom, drop them in boiling water for 30 seconds, then into ice water. The skins slip right off like they're embarrassed to be there. Slice them about 1/4-inch thick — thick enough to maintain texture but thin enough to cook through. Toss them with sugar, cornstarch, lemon juice, cinnamon, nutmeg, and a pinch of salt. Let them sit while you roll out the crust; this draws out some juice so your bars won't be watery.
- Preheat your oven to 375°F. Roll out the chilled dough between two sheets of parchment paper — this prevents sticking without adding extra flour that would toughen the crust. You're looking for a rectangle slightly larger than your 9x13 pan. Don't stress about perfect edges; we're trimming them later. Transfer the dough to the pan by flipping the parchment paper over and peeling it off. Press it gently into the corners and up the sides, then trim any overhang. Dock the bottom with a fork to prevent bubbling.
- Now for the game-changer: blind-bake that crust for 12 minutes. Most recipes skip this step and you end up with a soggy bottom that ruins everything. You want it just starting to turn golden at the edges — it'll finish baking with the filling. While it's in the oven, make your crumble topping by combining flour, brown sugar, oats, cinnamon, and salt. Cut in the cold butter until you have clumps ranging from pea to marble-sized. Stick this in the fridge until needed.
- Remove the partially baked crust and immediately reduce the oven temperature to 350°F. This temperature drop is crucial — it cooks the filling gently without burning the crust or overcooking the peaches. Pour the peach mixture (juices and all) over the warm crust. The heat starts cooking the fruit immediately, preventing a watery layer between crust and filling. Distribute the crumble topping evenly over the peaches, pressing down gently so it adheres. You want full coverage but don't pack it down — those nooks and crannies get deliciously crispy.
- Bake for 35-40 minutes, rotating halfway through. The top should be golden brown and the filling should be bubbling up around the edges. This bubbling is your visual cue that the cornstarch has activated and your filling will set properly. If the crumble starts browning too quickly (around minute 25), tent the pan loosely with foil. You want deep color for flavor, but burnt topping is a tragedy we cannot recover from. The smell at this point should make you slightly dizzy with anticipation.
- Here's where most recipes fail: they tell you to cut immediately. Don't do it! Let these beauties cool for at least 2 hours. I know, I know — it's torture. But the filling needs time to set, and cutting warm bars results in a soupy mess that, while delicious, won't win any beauty contests. The cornstarch continues thickening as it cools, transforming from liquid gold to sliceable perfection. Use this time to clean up, make coffee, or just sit in front of the oven smelling your hands like a weirdo.
- Once completely cool, lift the bars out using the parchment paper handles. Dust with powdered sugar just before serving — any earlier and it'll dissolve into the topping. Cut into squares or rectangles depending on your audience. For a dinner party, go elegant with small rectangles. For a potluck, sturdy squares that can survive enthusiastic grabbing. Serve slightly warm with ice cream, or at room temperature for maximum peach flavor. Either way, prepare for people to make involuntary happy noises.
That's it — you did it. But hold on, I've got a few more tricks that'll take this to another level...
Insider Tricks for Flawless Results
The Temperature Rule Nobody Follows
Room temperature ingredients are the enemy here. Everything needs to be cold — the butter, the water, even the flour if your kitchen is warm. I keep my flour in the freezer during summer because I'm that serious about flaky crust. When the butter stays cold until it hits the oven, it creates steam pockets that translate to layers so delicate they shatter under your fork. Warm butter melts into the flour, creating a tough, greasy crust that tastes like regret. If you touch the dough and it feels soft or sticky, wrap it up and chill it for 15 minutes. Your patience will be rewarded with a crust that people will ask you about.
Why Your Nose Knows Best
Don't rely on timers alone — your nose is the most sophisticated kitchen tool you own. When these bars are perfectly baked, your kitchen will smell like a peach cobbler had a baby with a butter cookie and they opened a bakery in heaven. If you smell fruit and sugar but no buttery richness, give it five more minutes. If you smell anything approaching burnt, get those bars out immediately. The line between golden and burnt is thin and unforgiving. I set two timers: one for 10 minutes before I think they'll be done, and one for the full time. The first timer reminds me to start paying attention to smell and color.
The 5-Minute Rest That Changes Everything
After you pull the bars from the oven, let them sit undisturbed for exactly 5 minutes. During this time, the filling continues to bubble and the topping sets slightly. Run a thin knife around the edges immediately while they're still hot — this prevents the caramelized fruit from welding to the pan. But resist the urge to cut or even jiggle the pan. These five minutes are when the magic happens, when everything transforms from hot ingredients to cohesive dessert. It's like letting a steak rest, except instead of meat juices, we're talking about peach caramel and buttery crumble.
The Overnight Advantage
These bars taste better the next day, and I'm prepared to die on this hill. Something miraculous happens overnight — the flavors meld and deepen, the filling sets to perfect sliceable consistency, and the crust achieves this texture that's somehow both crisp and tender. Make them Saturday afternoon for Sunday brunch and you'll understand what I'm talking about. Store them uncovered at room temperature for the first night (covering creates condensation that softens the topping), then wrap tightly after cutting. They'll keep for four days, though I've never personally witnessed them lasting that long.
Creative Twists and Variations
This recipe is a playground. Here are some of my favorite ways to switch things up:
The Bourbon Peach Bombshell
Add two tablespoons of good bourbon to the peach filling along with the lemon juice. The alcohol cooks off, leaving behind this incredible depth that makes people ask "what is that amazing flavor?" Use something you'd actually drink — cheap bourbon tastes like regret. Top with a brown butter crumble by browning the butter before cutting it into the topping. The nutty flavor pairs with the bourbon like they were made for each other.
The Tropical Vacation Version
Swap half the peaches for fresh mango, add a pinch of cardamom to the filling, and replace 1/4 cup of flour in the crust with shredded coconut. Suddenly you're eating peach bars that taste like a beach vacation. Serve with coconut ice cream and prepare for people to ask if you went to culinary school. The mango adds this incredible perfume and stretches peach season when supplies run low.
The Breakfast Bar Makeover
Add 1/2 cup of toasted pecans to the crumble topping and reduce the sugar in the filling by 2 tablespoons. Stir a tablespoon of maple syrup into the peaches instead. These are breakfast-appropriate enough that you can justify eating them at 7 AM with coffee. The nuts add protein, the reduced sugar prevents that mid-morning crash, and the maple somehow makes them taste like pancakes and peaches had a beautiful baby.
The Spicy Southern Belle
Add a pinch of cayenne and a tablespoon of bourbon to the filling, plus an extra 1/4 teaspoon of cinnamon. The heat is subtle — just enough to make your lips tingle and enhance the peach flavor. Top with a crumble that includes 1/4 cup of chopped candied ginger. The spice and heat make these incredibly sophisticated, perfect for when you want to impress people who think dessert is boring. They'll never see you coming.
The Late Summer Flex
When peaches start getting less perfect, this variation saves the day. Use a mix of peaches and nectarines, add a handful of fresh raspberries to the filling, and swap the cinnamon for fresh thyme. The berries add acidity and color, while the thyme gives it this incredible herbaceous note that screams "I know what I'm doing in the kitchen." It's the recipe that makes farmers market vendors ask for your card.
The Winter Survival Mode
Use frozen peaches (thaw and drain well) and add 1/2 teaspoon of almond extract to the filling. The extract compensates for the less-intense peach flavor and gives it this incredible aroma that makes your kitchen smell like summer in February. Double the crumble topping because winter requires extra comfort, and serve warm with vanilla ice cream while wearing fuzzy socks. It's survival food at its finest.
Storing and Bringing It Back to Life
Fridge Storage
After the first night at room temperature, wrap these bars tightly in plastic wrap or store in an airtight container. They'll keep for up to 4 days in the fridge, though the topping will soften slightly. To restore crispness, warm individual bars in a 350°F oven for 5-7 minutes. The topping re-crispies beautifully, and the filling becomes molten and incredible again. Never microwave them — it makes the crust rubbery and the topping soggy. If you must microwave, do it for 10 seconds maximum, but know that you're breaking my heart.
Freezer Friendly
These bars freeze exceptionally well, which is dangerous knowledge. Cut them into squares, wrap each one in plastic wrap, then foil, and freeze for up to 3 months. Thaw overnight in the fridge, then warm in a 350°F oven for 8-10 minutes. They'll taste almost as good as fresh, which means you'll never be more than 15 minutes away from peach bar perfection. I keep a stash in my freezer for emergencies, which I've defined as Tuesday, rainy days, or when I need to bribe someone.
Best Reheating Method
The oven is your friend here. Place bars on a parchment-lined baking sheet and warm at 350°F for 5-8 minutes. They'll taste like you just pulled them from the oven, with a crisp topping and warm, jammy filling. For the full experience, add a tiny splash of water to the pan before reheating — it creates steam that keeps the filling from drying out. Serve immediately with ice cream that melts into all the nooks and crannies. It's like a warm hug from your future self.