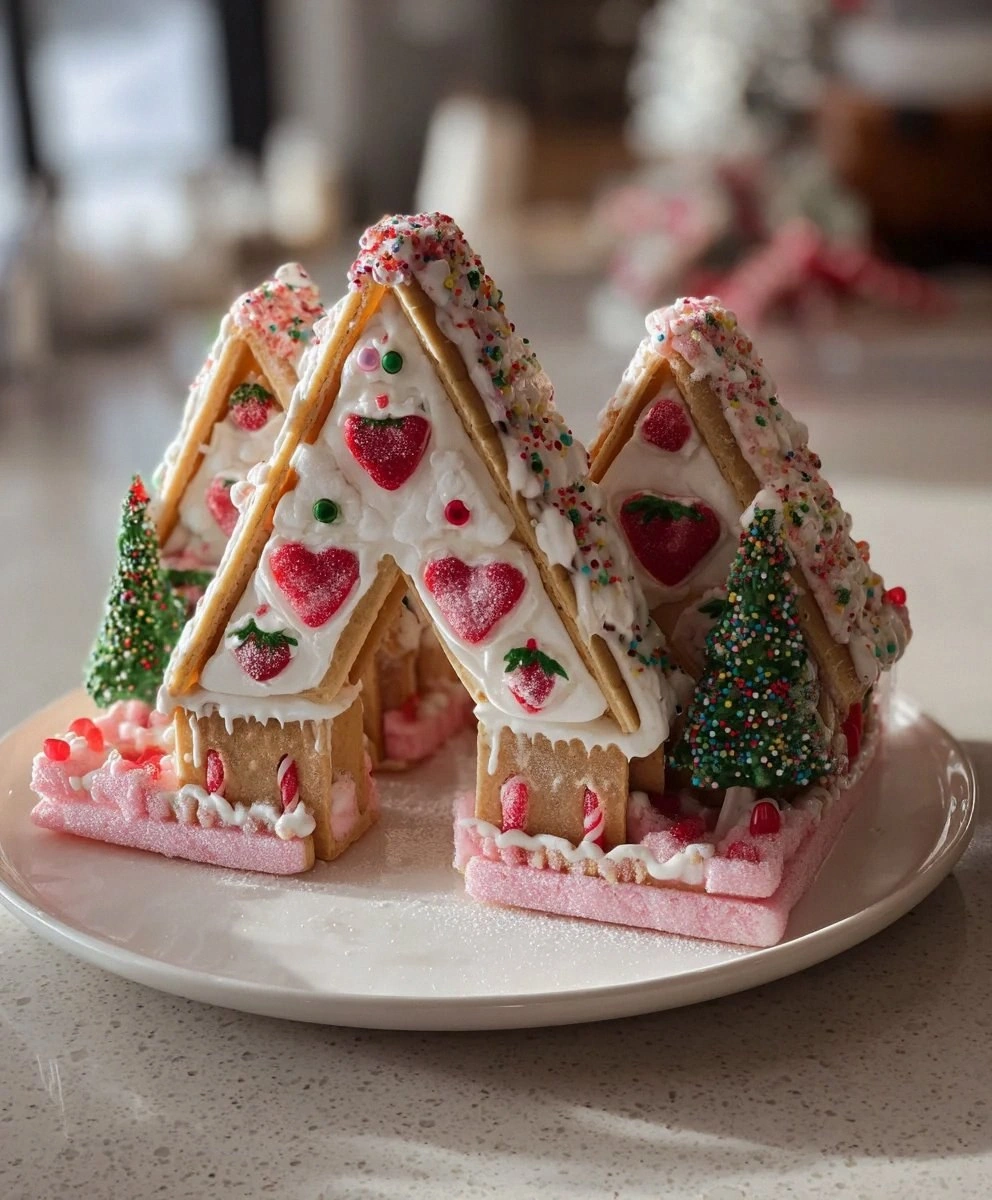
I still remember the exact moment my annual gingerbread house tradition imploded in spectacular fashion. There I was, sleeves rolled up, kitchen looking like a flour bomb detonated, and my supposedly sturdy royal-icing mortar was sliding off the cookie walls like a bad Botox job. My daughter watched in horror as the entire north wall collapsed, taking half the roof with it. In that defeated moment, staring at the sugary rubble, I spotted a box of strawberry Pop-Tarts on the counter and thought, "Well, how much worse could this get?" Turns out, it was the best kitchen disaster I've ever had. What started as a desperate Hail Mary became the most requested holiday tradition in our house – a Pop-Tart gingerbread house that's so ridiculously fun to build, so surprisingly sturdy, and so addictively delicious that I've been making them exclusively for five years running.
Here's the beautiful irony: while traditional gingerbread houses crack, crumble, and taste like cardboard that's been left in the rain, these Pop-Tart constructions are structurally sound enough to survive an earthquake and actually taste like something you'd want to eat. The frosted pastry walls lock together with the grip of a jealous ex, and when you bite into a piece, you get that familiar strawberry jam sweetness playing against the crisp icing and candy decorations. It's like someone took your childhood breakfast and merged it with the best parts of the holidays, creating a Frankenstein's monster of festive deliciousness that will haunt your dreams in the best possible way.
The first time I served this at a holiday party, I watched grown adults turn into sugar-crazed children, sneaking pieces off the back wall when they thought nobody was looking. My neighbor, a cardiologist who lectures about refined sugar, asked for the recipe with the sheepish look of someone who just got caught eating cake for breakfast. Even my mother-in-law, who considers store-bought pastries a personal affront to her Italian heritage, requested her own mini version. This isn't just a recipe – it's a gateway drug to pure holiday joy, and I'm about to make you the dealer.
Picture yourself on Christmas morning, the house smelling like toasted pastry and vanilla icing, kids bouncing with anticipation as you unveil a candy-covered mansion that's entirely edible. No more dry gingerbread that crumbles like ancient parchment. No more icing that sets harder than concrete. Just pure, unadulterated fun that tastes as good as it looks. Let me walk you through every single step – by the end, you'll wonder how you ever made it any other way.
What Makes This Version Stand Out
Instant Gratification: While traditional gingerbread houses require mixing dough, chilling, rolling, cutting, baking, cooling, and praying nothing warps in the oven, this beauty comes together in under an hour. The Pop-Tarts are pre-baked perfection, ready to become walls and roofs the moment you open the box. It's like having a head start in a race where everyone else is still tying their shoes.
Structural Integrity: Here's where physics works in our favor – the slight flexibility in Pop-Tart pastry means your house can handle minor earthquakes, enthusiastic toddlers, and that one uncle who always bumps into the table. The frosting acts like delicious edible cement, gripping better than any royal icing I've ever mixed. I've shipped these houses across states for office parties, and they arrive intact like sugared time capsules.
Actually Edible: Let's be honest – traditional gingerbread houses look pretty but taste like sweetened plywood. Pop-Tarts, however, are designed to be devoured. When the holiday feast is over and everyone's in a food coma, you'll find guests sneaking back to nibble on candy-covered walls. The strawberry filling adds a bright, fruity note that cuts through all the sugar, making it dangerously easy to eat three servings without realizing.
Kid-Proof Construction: Little hands can press candy into frosting without the delicate touch traditional gingerbread demands. My five-year-old niece built her own mini house last year, and it looked like a rainbow threw up on a pastry – which was perfect and she was thrilled. There's no wrong way to decorate when your base is already colorful and fun.
Year-Round Potential: Once you master the technique, you can adapt this for any holiday. Heart-shaped Pop-Tarts for Valentine's castles, chocolate ones for Halloween haunted houses, even s'mores flavor for summer camping scenes. It's like having a edible construction set that changes with the seasons.
Conversation Starter: Nothing breaks the ice at holiday gatherings like revealing that the impressive centerpiece is made entirely of breakfast pastries. You'll field questions, take photos for strangers' Instagram stories, and become the legendary host who thinks outside the gingerbread box. My neighbor still talks about the Pop-Tart Eiffel Tower I made for Bastille Day.
Budget-Friendly Brilliance: Four boxes of Pop-Tarts, some frosting, and clearance holiday candy costs less than half of what you'd spend on premium gingerbread ingredients. Yet the final result looks like you hired a professional pastry chef with a quirky sense of humor. It's the ultimate kitchen hack for looking fancy on a ramen budget.
Inside the Ingredient List
The Foundation Squad
Strawberry Pop-Tarts form the backbone of this operation, and not just because they're delicious. The strawberry variety has the perfect balance of structural integrity and flexibility – the pastry holds its shape but has enough give to fit together without cracking. The pink frosting adds a cheerful base color that peeks through candy decorations like stained glass. If you absolutely must substitute, go for brown sugar cinnamon or chocolate fudge, but avoid the ones with chunky sugar crystals on top – they'll make your walls look like they have barnacles.
Decorating icing isn't just glue – it's the unsung hero that transforms humble breakfast pastries into architectural marvels. Skip the fancy pastry bags and tips for this project; you need the stuff in tubes that you can snip and squeeze like toothpaste. The cheaper brands actually work better here because they set firmer. Pro tip: buy twice as much as you think you need because you'll use half of it "taste-testing" and fixing mistakes that totally weren't your fault.
The Candy Construction Crew
Holiday-themed confectionery is where your personality shines through like a disco ball at a retirement party. Mini candy canes become fence posts, gumdrops transform into whimsical shrubs, and those metallic dragées add the kind of sparkle that makes everything look expensive. The key is mixing textures – something crunchy (peppermint), something chewy (gummy bears), and something that looks like it belongs in a jewelry store (those gold coins that taste like chocolate-flavored wax but look fabulous).
Don't overlook the power of cereal in your decorating arsenal. Frosted Mini-Wheats make excellent roof tiles, Chex cereal becomes stonework, and a few strategically placed Froot Loops can pass as holiday wreaths. It's like having a whole hardware store of edible building materials, except everything tastes better than actual hardware and won't require a trip to the emergency room when your toddler inevitably samples the inventory.
The Secret Weapons
Pretzel sticks are the rebar of the candy construction world, providing hidden support for candy-heavy sections. They snap cleanly to size and add a salty counterpoint to all the sweetness. I learned this trick after my candy chimney collapsed under its own sugar weight, taking out a gingerbread family like some tragic holiday disaster movie.
Shredded coconut dyed green with food coloring becomes instant snowy foliage. Mix it with a few drops of water and food coloring in a bag, shake it like you're making glitter bombs, and voilà – you've got landscaping materials that would make any edible HOA proud. Plus, when guests ask about your "clever use of desiccated coconut," you sound like a culinary genius instead of someone who just really likes candy.
The Unexpected Stars
Mini marshmallows aren't just for hot chocolate – they become perfect snow drifts, chimney smoke, and when cut diagonally, they transform into tiny roof tiles that would make any elf architect jealous. The secret is using scissors dusted with powdered sugar to prevent sticking, turning marshmallow cutting from a gooey nightmare into a satisfying craft project.
Those wafer cookies that come in pastel colors? They're edible drywall. Break them into shapes and you've got doors, windows, even tiny shutters that look like they belong in a fairy tale. Plus, they snap cleanly without crumbling, unlike graham crackers that always seem to break at the exact wrong angle like they're plotting against you.
Everything's prepped? Good. Let's get into the real action...
The Method — Step by Step
- Start by creating a stable foundation – this isn't just culinary advice, it's life wisdom. Grab a sturdy piece of cardboard covered in aluminum foil, or if you're feeling fancy, a cheap cutting board from the dollar store. The key is having something you can move around because once construction starts, you don't want to discover your kitchen table is now permanently decorated with candy cement. I learned this the hard way when I had to serve Christmas dinner around a half-finished candy mansion because it was too heavy to move.
- Lay out your Pop-Tarts like you're playing a delicious game of Tetris. For a basic house, you'll need six pastries: four for walls, two for the roof. The trick is to let them sit out for about ten minutes – this slight softening makes them less likely to crack when you start building. While they're acclimating, pipe a thick line of icing along the bottom edge of your first wall. Press it firmly onto your base and hold for a slow count of thirty. Yes, thirty seconds feels like forever when you're excited, but rushing this step is how you end up with the Leaning Tower of Pisa in pastry form.
- Build your walls one at a time, using icing as both glue and gap-filler. The beauty of Pop-Tarts is that they're perfectly rectangular – no wonky gingerbread that expanded in the oven like it's trying to escape. Pipe icing along the edge where walls meet, then use a butter knife to smooth it like you're caulking a bathroom. This icing will be visible, so think of it as decorative mortar rather than something to hide. My daughter calls this "frosting surgery" and takes it very seriously, tongue sticking out in concentration.
- Now for the roof – this is where most people panic, but you've got this. Pipe a thick line of icing along the top edge of both long walls, then gently place your roof pieces so they meet at the top like a cozy A-frame cabin. They might slide a bit at first, but gravity is your friend here. The weight actually helps everything set together. If you're feeling architectural, add a third Pop-Tart as a center support beam – just ice it underneath where the roof peaks meet. It's like giving your house a spine.
- Here's where patience pays off – let everything set for at least twenty minutes before decorating. I know, I know, you've got candy burning a hole in your pocket and visions of sugarplums dancing in your head. But trying to decorate too early is like putting lipstick on a wobbly jelly – it just makes a mess. Use this time to organize your candy by color, size, and how likely you are to eat it before it makes it onto the house (looking at you, gummy bears).
- Start decorating with the big stuff – candy canes for corner posts, gumdrops for pathway lights, those weird marshmallowy Santa things that nobody actually likes but look adorable as tiny lawn ornaments. Work from the bottom up, like you're painting a room. This way if you accidentally bump something, you're not taking out three hours of delicate work. Plus, it's deeply satisfying to see your house gain personality one candy at a time.
- The roof is your canvas for creativity. Create neat rows of mini candy canes as shingles, or go full abstract with a mosaic of M&Ms that would make a Byzantine mosaic artist weep with envy. My personal favorite is using frosted cereal flakes as shingles, overlapping them like real roof tiles. They catch the light beautifully and add texture that makes people want to reach out and touch.
- Windows and doors are what transform this from "pile of candy on pastries" to "architectural masterpiece." Wafer cookies make perfect doors – just cut them to size with kitchen scissors. For windows, use small rectangular candies or pipe white icing in window shapes. Add curtains made from fruit leather, or create tiny flower boxes using jelly beans and pretzel stick window frames. This is where you can really show off your attention to detail.
- The final flourish is landscaping. Create a path to the door using candy corn or chocolate chips placed pointy-side up. Use green coconut flakes as grass, and don't forget a candy wreath on the door. If you're feeling extra, pipe some icing snow on the roof edges, letting it drip like real icicles. Stand back and admire your work – you've just created something that would make Willy Wonka jealous and Martha Stewart confused.
- That's it – you did it. But hold on, I've got a few more tricks that'll take this to another level...
Insider Tricks for Flawless Results
The Temperature Rule Nobody Follows
Room temperature isn't just for butter – it's the secret handshake of Pop-Tart architecture. Cold Pop-Tarts are brittle and prone to cracking, while warm ones get too flexible and your house starts looking like it melted in a Salvador Dali painting. The sweet spot is letting them sit out for exactly twelve minutes in a 68-72°F room. I set a timer because I'm impatient and have ruined too many houses by jumping the gun. If your kitchen runs hot from oven activity, pop the pastries in the fridge for five minutes first to firm them up.
Why Your Nose Knows Best
Here's something they don't teach in culinary school – smell your icing before you start. Fresh icing has a clean, sweet vanilla scent. If it smells sour or off, it's lost its binding power and your house will fall apart faster than a celebrity marriage. I learned this after a tube of ancient icing caused a catastrophic failure that sent candy raining down like some sort of festive apocalypse. Now I do the sniff test and date my icing tubes with masking tape like a responsible adult who doesn't want to explain to children why their candy house committed suicide.
The 5-Minute Rest That Changes Everything
After you finish decorating, walk away for five minutes. Not ten, not two – five. This is when the magic happens. The icing sets just enough to hold everything in place, but not so much that you can't fix last-minute details. Use this time to clean up, hide the evidence of how much candy you "sampled," and prepare your grand reveal. I've seen people skip this step and try to move their house immediately, only to watch their candy mosaic slide off like a sugary avalanche. Patience, young grasshopper.
The Lighting Trick That Makes You Look Like a Pro
Here's where photography skills meet pastry architecture. Place your finished house near a window for natural light, but not in direct sunlight or you'll have a melty mess. The side lighting creates shadows that make your candy decorations pop and hides any less-than-perfect icing work. If you're serving at night, position a small desk lamp to the side at a 45-degree angle. Suddenly your candy house looks like it belongs in a magazine instead of a kindergarten craft fair. My Instagram likes tripled after I learned this trick, and my mother finally stopped asking when I'd learn to make "real" desserts.
The Storage Secret That Keeps It Fresh
Finished houses can last up to a week in a cool, dry place, but here's the insider tip: slip a few packets of silica gel (you know, those "do not eat" packets from shoe boxes) under the base. They absorb moisture that would otherwise turn your crispy creation into a sticky, sagging mess. Just make sure they're hidden from view because nothing ruins the magic like having to explain to children why there are poison packets in their edible house. I wrap mine in decorative paper so they look like tiny presents under the house.
Creative Twists and Variations
This recipe is a playground. Here are some of my favorite ways to switch things up:
The Winter Wonderland Edition
Use chocolate fudge Pop-Tarts as the base and go monochromatic with white chocolate chips, coconut flakes, and marshmallows. Add a few silver dragées for sparkle and suddenly you've got a sophisticated color palette that wouldn't look out of place in a design magazine. The chocolate-strawberry combination when you bite into it is like eating a chocolate-covered strawberry, but with the added satisfaction of having destroyed a tiny building.
The Tropical Getaway House
Break all the holiday rules and use strawberry Pop-Tarts with tropical candy – Swedish fish swimming in icing ponds, gummy pineapples as palm trees, and fruit roll-ups cut into beach towels. Add a marshmallow Santa wearing sunglasses and suddenly Christmas is happening on a beach somewhere. It's perfect for people who live in warm climates or anyone who's just really tired of snow.
The Haunted Mansion
Use chocolate Pop-Tarts and decorate with black licorice, purple candy corn, and gummy worms crawling out of the windows. Create "dirt" by crushing chocolate cookies, and use red icing to make it look like the house is bleeding. It's surprisingly popular with kids who are going through their "everything must be spooky" phase, and adults who never quite grew out of their goth stage.
The Mini Village
Instead of one big house, make six tiny ones using half Pop-Tarts. They're perfect for place settings at dinner parties, and everyone gets their own personal house to destroy. Use jelly beans as tiny wreaths and create a whole neighborhood. The best part is when people start trading houses like they're in some sort of edible real estate market.
The Breakfast Bonanza
Go full meta and use only breakfast-themed decorations – cereal pieces, mini pancakes (the frozen kind), and bacon bits for the roof. Create a syrup pond using thinned icing, and suddenly your house is part of a complete breakfast. It's the perfect centerpiece for Christmas morning brunch, and nobody will question why you're eating candy before noon.
The Candy Counter House
Make this entirely from vintage candy – the kind your grandparents remember. Candy buttons for wallpaper, rock candy for chandeliers, and those weird peanut chews that nobody actually likes but look great as foundation stones. It becomes a conversation piece about candy history, and older guests will spend the evening reminiscing about penny candy stores while younger guests wonder what half the stuff even is.
Storing and Bringing It Back to Life
Fridge Storage
Here's where tradition gets turned on its head – never refrigerate your Pop-Tart house. The moisture will turn your crispy walls into soggy sadness, and you'll wake up to a collapsed sugar slum. Instead, keep it in the coolest room of your house, away from direct heat sources. If you must move it to the fridge for space reasons, first seal it in a large plastic container with silica gel packets and accept that you're playing a risky game with delicious consequences.
Freezer Friendly
Surprisingly, these houses freeze beautifully for up to two months. The key is flash-freezing first – set the house in your freezer uncovered for two hours, then wrap loosely in plastic wrap followed by foil. When ready to display, thaw in the refrigerator overnight, then let it come to room temperature before unwrapping. The colors might bleed slightly, but the structure stays intact. I've got one in my freezer right now that's waiting for my nephew's birthday in July because he loved the Christmas version so much.
Best Reheating Method
If your house has been sitting out and the icing has gone soft, you can actually revive it. Set it in a 200°F oven for exactly three minutes – no more, or you'll have a melty disaster. This dries out the icing just enough to restore structural integrity without affecting the candy decorations. Let it cool completely before touching, and suddenly your slightly droopy house stands proud again. It's like magic, except the magic is thermodynamics and you're the wizard of winter wonderland restoration.