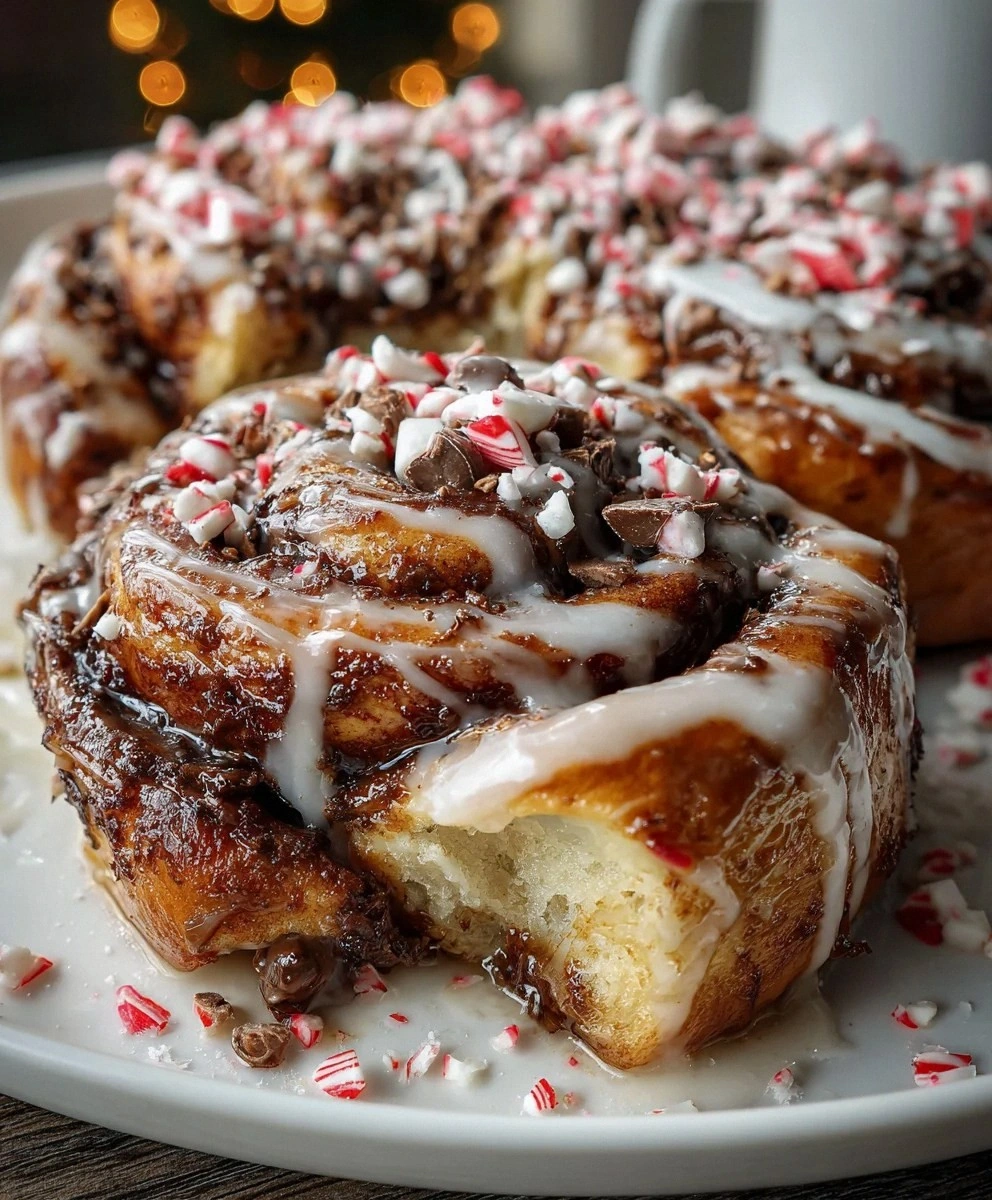
Picture this: it's Christmas morning, you're wearing that ridiculous reindeer sweater your aunt knitted, and you pull a pan of these beauties from the oven. The kitchen fills with the intoxicating dance of warm yeast bread, dark chocolate, and cool peppermint that makes everyone abandon their presents and drift toward the kitchen like zombies drawn to brain buffet. The rolls are still bubbling slightly around the edges where the butter, sugar, and chocolate have created this insane caramelized pool of joy. You drizzle on the white chocolate-peppermint glaze while they're warm, and it seeps into every swirl and crevice, creating rivers of sweet perfection. When you finally tear one apart (because cutting is for amateurs), the soft, pillowy dough stretches like a cloud, revealing layers studded with chunks of peppermint bark that have melted into pure happiness. The contrast between the tender bread, the gooey chocolate-peppermint filling, and that crackly sweet glaze on top creates a texture symphony that'll make you question every other breakfast decision you've ever made.
What makes these rolls absolutely legendary isn't just the flavor bomb they deliver — it's the technique that guarantees success even if you've never made yeast dough in your life. I'm about to share my secret weapon: a cold-ferment method that develops incredible flavor while letting you do most of the work the night before. The dough is enriched with just enough butter and eggs to make it rich and tender, but not so much that it becomes heavy like a brick. The filling uses a combination of dark chocolate chunks and crushed peppermint bark that creates these pockets of molten chocolate throughout each roll, while the peppermint flavor stays bright and fresh instead of tasting like you accidentally brushed your teeth with dessert. And here's the real game-changer — instead of just dumping peppermint extract into everything, we layer the flavor with real peppermint bark, a touch of extract in the filling, and then that white chocolate glaze studded with more crushed candy on top. The result is complex, sophisticated, and absolutely irresistible.
Let me walk you through every single step — by the end, you'll wonder how you ever made it any other way. Whether you're planning a cozy Christmas morning with family, need to impress at a holiday brunch, or just want to treat yourself to the most indulgent weekend baking project, these peppermint bark cinnamon rolls are about to become your new obsession. Fair warning though: once you make these, people will start inviting themselves over during the holidays. I've had neighbors I've never spoken to suddenly become best friends when they catch wind that I'm baking these. But honestly? That's a small price to pay for what might be the greatest holiday breakfast creation known to mankind.
What Makes This Version Stand Out
Flavor Explosion: Most peppermint desserts taste like you accidentally drank mouthwash, but these rolls layer flavor like a symphony. The dough provides a neutral, slightly sweet canvas, the filling brings deep chocolate richness with bright peppermint notes, and the glaze adds creamy white chocolate sweetness with crunchy candy pieces for texture. Each bite gives you warm, cool, soft, crunchy, and gooey all at once — it's like a party in your mouth where everyone's invited and somehow they all get along.
Texture Perfection: The combination of a cold-fermented dough with the right ratio of butter creates rolls that are simultaneously fluffy and rich, with a tender crumb that pulls apart in sheets. The filling creates these incredible pockets of chocolate that stay molten even after cooling, while the crushed peppermint bark provides delightful crunch against the soft bread. The glaze sets into a crackly shell that shatters when you bite, revealing the soft roll beneath.
Make-Ahead Magic: Here's where most recipes fail — they make you wake up at dawn to start proofing dough. Not this one. The cold fermentation means you mix the dough the night before, let it rise slowly in the fridge overnight, and shape the rolls in the morning. The flavor actually improves with the long, cold rise, developing complexity that no quick-rise method can match.
Ingredient Quality: This recipe uses real peppermint bark instead of just extract, European-style butter for better flavor, and good quality dark chocolate that actually tastes like chocolate instead of brown wax. The difference is immediately obvious — these taste like they came from an artisan bakery, not a mall food court.
Crowd Reaction: I've served these to people who claim they "don't like peppermint" and watched them inhale three rolls without apology. The flavor is balanced, not overwhelming, with the chocolate providing depth and the peppermint adding brightness rather than medicinal harshness. Even kids who usually turn their noses up at anything remotely sophisticated devour these and ask for the recipe.
Technique That Actually Works: Instead of the usual "roll, cut, pray" method that leaves you with misshapen rolls that unravel during baking, this recipe uses a Japanese milk bread base that's naturally more elastic and forgiving. The shaping technique I'm sharing creates perfect spirals that stay intact, and the proofing method ensures even rising without the dreaded center collapse.
Visual Impact: These rolls look like they belong in a magazine spread. The contrast between the golden-brown bread, the dark chocolate spirals peeking through, and the white glaze studded with red and white peppermint pieces creates a presentation that stops people in their tracks. They photograph beautifully, which explains why my Instagram explodes every time I post them.
Inside the Ingredient List
The Flavor Base
Bread flour forms the backbone of these rolls, and here's why it matters: the higher protein content (12-14%) compared to all-purpose flour creates stronger gluten networks. This means your rolls will have that perfect chewy texture that makes cinnamon rolls addictive rather than cakey or biscuit-like. The protein also helps capture the gases from yeast fermentation, giving you taller, fluffier rolls that don't collapse under the weight of all that chocolate filling. If you only have all-purpose flour, you can use it, but your rolls will be more tender and less structured — they'll still taste incredible, just with a different texture profile.
Whole milk isn't just a liquid ingredient here — it's carrying fat, proteins, and natural sugars that contribute to browning and flavor development. The lactose in milk caramelizes during baking, creating those gorgeous golden-brown tops that make people drool. I always use whole milk because the fat helps keep the rolls tender and extends their shelf life, but 2% works if that's what you have. Just please don't use skim milk unless you enjoy eating cardboard-flavored bread.
Instant yeast is my go-to because it eliminates the proofing step that intimidates so many home bakers. You can mix it directly with your dry ingredients, and it's more forgiving of temperature variations than active dry yeast. The rapid rise time means less waiting around, and it produces consistent results batch after batch. If you only have active dry yeast, you can use it — just proof it in warm milk with a teaspoon of sugar for 5-10 minutes until foamy before adding to the dough.
The Texture Crew
European-style butter contains a higher fat percentage (82-86%) compared to standard American butter (80%), and this extra fat makes a noticeable difference in both flavor and texture. The butter in the dough creates tenderness and richness, while the butter in the filling helps distribute the chocolate and peppermint evenly. When melted together with the brown sugar, it creates this incredible caramel-like sauce that seeps into every layer of the roll. Yes, it's more expensive, but this is a special occasion recipe — splurge a little and taste the difference.
Eggs serve multiple functions here: they enrich the dough, add color, and help with structure. The yolks contain lecithin, which acts as an emulsifier, helping the fat and water-based ingredients play nicely together. This creates a more cohesive dough that's easier to work with and produces a more uniform crumb. Room temperature eggs incorporate better than cold ones, so pull them out of the fridge about an hour before you start mixing.
The Unexpected Star
Peppermint bark is where this recipe diverges from every other cinnamon roll out there. Instead of just using peppermint extract, we're incorporating actual peppermint bark — that magical combination of dark chocolate, white chocolate, and peppermint candy — into three different components. In the filling, crushed peppermint bark creates pockets of molten chocolate with bright peppermint flavor that stays fresh and vibrant. The candy pieces provide textural interest and visual appeal, while the chocolate component enriches the filling beyond what plain sugar and butter could achieve. When selecting peppermint bark, look for versions with real chocolate rather than candy coating — the flavor difference is dramatic.
Dark chocolate with 60-70% cacao content provides the perfect balance of bitterness to counteract the sweetness of the filling. The higher cacao percentage means less sugar and more complex chocolate flavor that complements rather than competes with the peppermint. When heated, good quality dark chocolate melts into these gorgeous rivers of pure chocolate bliss that flow through each roll. Avoid milk chocolate here — it would make the filling too sweet and one-dimensional.
The Final Flourish
White chocolate for the glaze might seem like overkill after all that dark chocolate in the filling, but here's the genius: white chocolate provides sweetness and creaminess without adding more bitter chocolate flavor. It creates a beautiful contrast against the dark spirals of the rolls, and when paired with a touch of peppermint extract, it reinforces the flavor theme without overwhelming the palate. The key is using real white chocolate (look for cocoa butter in the ingredients) rather than candy melts — the flavor difference is worth the extra dollar or two.
Heavy cream in the glaze serves two purposes: it creates the perfect drizzling consistency and adds richness that takes these rolls into dessert territory. The fat in the cream helps carry the peppermint flavor and creates a glaze that sets firm but not rock-hard. You can adjust the amount to create either a thin drizzle or a thick frosting depending on your preference. Pro tip: warm the cream slightly before mixing — it helps the white chocolate melt more smoothly and prevents seizing.
Everything's prepped? Good. Let's get into the real action...
The Method — Step by Step
- Start by warming your milk to exactly 110°F — use a thermometer here because too hot kills yeast and too cold makes your dough rise like it's stuck in molasses. While it's warming, take your butter out of the fridge to soften and pull your eggs to room temperature. In the bowl of your stand mixer (or a large regular bowl if you're going manual), whisk together the bread flour, sugar, salt, and instant yeast. The salt and yeast play nice together in instant yeast recipes, so no need to worry about keeping them separate like your weird aunt at family dinners.
- Create a well in your dry ingredients and pour in the warm milk, softened butter, and eggs. Using the dough hook on low speed (or a wooden spoon if you're old-school), mix until a shaggy dough forms. Increase to medium speed and knead for 8-10 minutes until the dough becomes smooth, elastic, and pulls away from the sides of the bowl. You'll know it's ready when you can stretch a small piece thin enough to see light through it without tearing — this is called the windowpane test, and it's your gluten development indicator. If the dough is sticking like crazy after 5 minutes, add flour a tablespoon at a time, but be conservative — too much flour makes tough rolls.
- Transfer the dough to a lightly oiled bowl, turning once to coat the top. Cover with plastic wrap and refrigerate for at least 8 hours or up to 24 hours. This cold fermentation is where the magic happens — the slow rise develops complex flavors and improves the dough's extensibility, making it easier to roll out later. Don't skip this step even if you're tempted to rush — it's the difference between good rolls and life-changing rolls. Plus, it means you can do most of the work the night before and still sleep in.
- When you're ready to assemble, remove the dough from the fridge and let it sit at room temperature for 30 minutes. While it's warming up, make your filling by combining brown sugar, softened butter, crushed peppermint bark, dark chocolate chunks, cinnamon, and peppermint extract in a bowl. Mix until it forms a spreadable paste — you want it thick enough to stay put but soft enough to spread easily. If your butter is still cold, microwave the mixture in 10-second bursts until spreadable but not melted.
- Roll the dough on a lightly floured surface into a 24x16-inch rectangle, about 1/4-inch thick. Don't stress about perfect edges — rustic is charming, and you're going to trim the ends anyway. Spread the filling evenly over the dough, going all the way to the edges except for a 1-inch strip along the long edge that will become your seam. Press the filling gently into the dough so it adheres and doesn't all squish out when you roll it up. This is not the time to be stingy with filling — use it all, every last bit.
- Starting from the long edge opposite your clean seam, roll the dough into a tight log. Use both hands and roll away from you, keeping it as tight as possible without stretching the dough. When you reach the end, pinch the seam to seal and place the log seam-side down. Trim the ragged ends (baker's treat!), then cut into 12 equal pieces using your dental floss method. Place the rolls cut-side up in a greased 9x13-inch pan, leaving space between them for the final rise.
- Cover the pan with a clean kitchen towel and let rise in a warm spot for 45-60 minutes until puffy and nearly doubled. I like to turn my oven on to 200°F for 2 minutes, then turn it off and place the rolls inside — this creates the perfect proofing environment. Don't let them over-proof or they'll collapse during baking. They're ready when they look like they're holding hands but haven't completely filled the pan.
- Bake in a preheated 350°F oven for 25-30 minutes until the tops are golden brown and the centers register 190°F on an instant-read thermometer. The filling should be bubbling around the edges and the rolls should be pulling away from each other slightly. While they're baking, make the glaze by whisking together white chocolate, heavy cream, butter, and peppermint extract until smooth and pourable. Adjust the consistency with more cream if needed — you want it thick enough to coat the rolls but thin enough to drizzle.
- Remove the rolls from the oven and let cool for exactly 5 minutes — this sets the structure but keeps them warm enough to melt the glaze slightly. Drizzle or spread the glaze over the warm rolls, then immediately sprinkle with additional crushed peppermint bark. The heat from the rolls will slightly melt the white chocolate in the glaze, creating those gorgeous drips down the sides. Serve warm and watch them disappear faster than your willpower at a sample sale.
That's it — you did it. But hold on, I've got a few more tricks that'll take this to another level...
Insider Tricks for Flawless Results
The Temperature Rule Nobody Follows
Here's the thing that separates amateur bakers from the pros: temperature control throughout the entire process. Your ingredients should all be at similar temperatures when you start mixing — cold eggs hitting warm milk can shock the yeast, while hot butter will create greasy pockets in your dough. I use a instant-read thermometer more in baking than I do for grilling, and it's the reason my rolls come out consistent every single time. The milk should be between 105-110°F for optimal yeast activity, your butter should be soft but not melted (think play-dough consistency), and your eggs should be room temperature. If you're rushed, you can warm eggs quickly by placing them in a bowl of warm water for 5 minutes, and soften butter by grating it or rolling it between parchment paper.
Why Your Nose Knows Best
Professional bakers don't rely on timers alone — we use all our senses, especially smell. When your rolls are perfectly baked, your kitchen will smell like heaven opened a bakery. The scent changes from raw yeast and flour to warm, toasty bread with caramelized sugar notes. If you start to smell anything sharp or burnt, you've gone too far. This might sound mystical, but trust your nose — it's been trained by evolution to detect when carbohydrates transform into their most delicious forms. I can walk into my kitchen and immediately tell if something's ready just by the aroma profile, and after you make these rolls a few times, you'll develop the same sixth sense.
The 5-Minute Rest That Changes Everything
After you pull these beauties from the oven, your entire being will scream at you to dive in immediately. Resist. Those five minutes of cooling aren't just about preventing burned tongues — they're crucial for the structure to set properly. During baking, the starches gelatinize and the proteins coagulate, but they need time to stabilize. If you cut into rolls too soon, they'll collapse and all that gorgeous filling will run out like a chocolate river. Five minutes allows the rolls to firm up while staying molten in the center, creating the perfect eating experience. Set a timer and walk away if you have to — your future self will thank you.
Creative Twists and Variations
This recipe is a playground. Here are some of my favorite ways to switch things up:
The Triple Chocolate Threat
Replace half the dark chocolate in the filling with milk chocolate and add 2 tablespoons of cocoa powder to the dough. This creates a mocha-flavored dough with layers of three different chocolates. The result is so intensely chocolatey that it makes chocolate lovers weep tears of joy. Top with the original white chocolate glaze but add chocolate shavings on top for the full triple chocolate experience.
The Orange-Peppermint Dream
Add the zest of one orange to the dough and substitute orange extract for half the peppermint extract in the filling. The combination of citrus and peppermint creates this sophisticated flavor profile that tastes like Christmas morning in the Swiss Alps. It's unexpected but absolutely magical — the orange brightens everything and makes the peppermint taste fresher rather than medicinal.
The Salted Caramel Version
Replace the brown sugar in the filling with caramel sauce (homemade or good quality store-bought) and sprinkle flaky sea salt over the filling before rolling. The sweet-salty combination with the peppermint creates this addictive quality that makes it impossible to eat just one. The caramel stays gooey and creates these incredible strings when you pull the rolls apart.
The Boozy Adults-Only Batch
Add 2 tablespoons of peppermint schnapps or white crème de menthe to the glaze and reduce the peppermint extract by half. The alcohol burns off during the warming process, but it leaves behind this complex flavor that makes people ask "what's in these?" in the best way possible. Just don't serve them to kids or anyone avoiding alcohol.
The Nutty Crunch Edition
Add 1 cup of toasted chopped pecans or walnuts to the filling and sprinkle some on top with the peppermint bark. The nuts provide textural contrast and their natural oils enhance the chocolate flavor. Toasting the nuts first brings out their oils and prevents them from tasting raw or muddy in the finished rolls.
The Mini Version
Instead of 12 large rolls, cut the log into 24 smaller pieces and bake in mini muffin tins. These create adorable bite-sized portions perfect for holiday parties or cookie exchanges. They bake faster (12-15 minutes) and the increased surface area means more crispy edges — the best part, according to half the people I've served these to.
Storing and Bringing It Back to Life
Fridge Storage
Store cooled rolls in an airtight container in the refrigerator for up to 5 days. The cold temperature prevents the growth of mold and keeps the dairy-based glaze safe, but it also causes the rolls to stale faster due to starch retrogradation. To combat this, I wrap each roll individually in plastic wrap before placing in the container — it prevents them from absorbing fridge odors and keeps them fresher longer. If you notice the glaze starting to weep or separate, that's normal and doesn't affect safety, though the texture won't be as appealing.
Freezer Friendly
These rolls freeze beautifully both before and after baking. For unbaked rolls, prepare through the cutting step, then freeze the individual rolls on a baking sheet. Once solid, transfer to a freezer bag and store for up to 2 months. When ready to bake, thaw overnight in the refrigerator, then proof and bake as directed. For baked rolls, cool completely, then wrap individually in plastic wrap and freeze in a freezer bag for up to 3 months. Thaw overnight in the refrigerator and rewarm in a 300°F oven for 10-15 minutes. The glaze doesn't freeze well, so make it fresh when you're ready to serve.
Best Reheating Method
The microwave works in a pinch, but it makes the bread rubbery and the filling greasy. Instead, wrap rolls in foil and warm in a 300°F oven for 10-15 minutes. For an even better result, place a small oven-safe dish with 1/4 cup of water in the oven while reheating — the steam helps restore moisture and keeps the rolls from drying out. If you're reheating just one roll, a toaster oven works perfectly. Always refresh with a new application of glaze, because the original glaze absorbs into the roll during storage and loses its appeal.