I was standing in my kitchen on a cold December night, the kind of night where the wind howls like a choir of disgruntled elves, when my roommate dared me to create a holiday treat that would make Santa ditch his milk and cookies for something more daring. I stared at the pantry, saw a lonely pack of Oreos and a box of red velvet Oreos that had been gathering dust, and thought, “What if I turned these humble biscuits into little ornaments of pure joy?” The idea was half‑mad, half‑inspired, and completely unstoppable. I grabbed the cream cheese, melted candy melts, and a sprinkle of glittery sanding sugar, and the kitchen instantly turned into a festive laboratory.
The moment the first batch of cookie crumbs hit the mixing bowl, the room filled with a sweet, buttery perfume that reminded me of grandma’s kitchen during the holidays. I could hear the faint crackle of the candy melts as they melted in the microwave, a sound like tiny fireworks announcing the upcoming celebration. My hands felt the cool, creamy texture of softened cream cheese as it merged with the crumb mixture, turning it into a pliable, velvety dough that clung to my fingertips like a secret. The scent of red candy melts, dark green, and pristine white swirled together, painting a mental picture of a Christmas tree lit by neon lights.
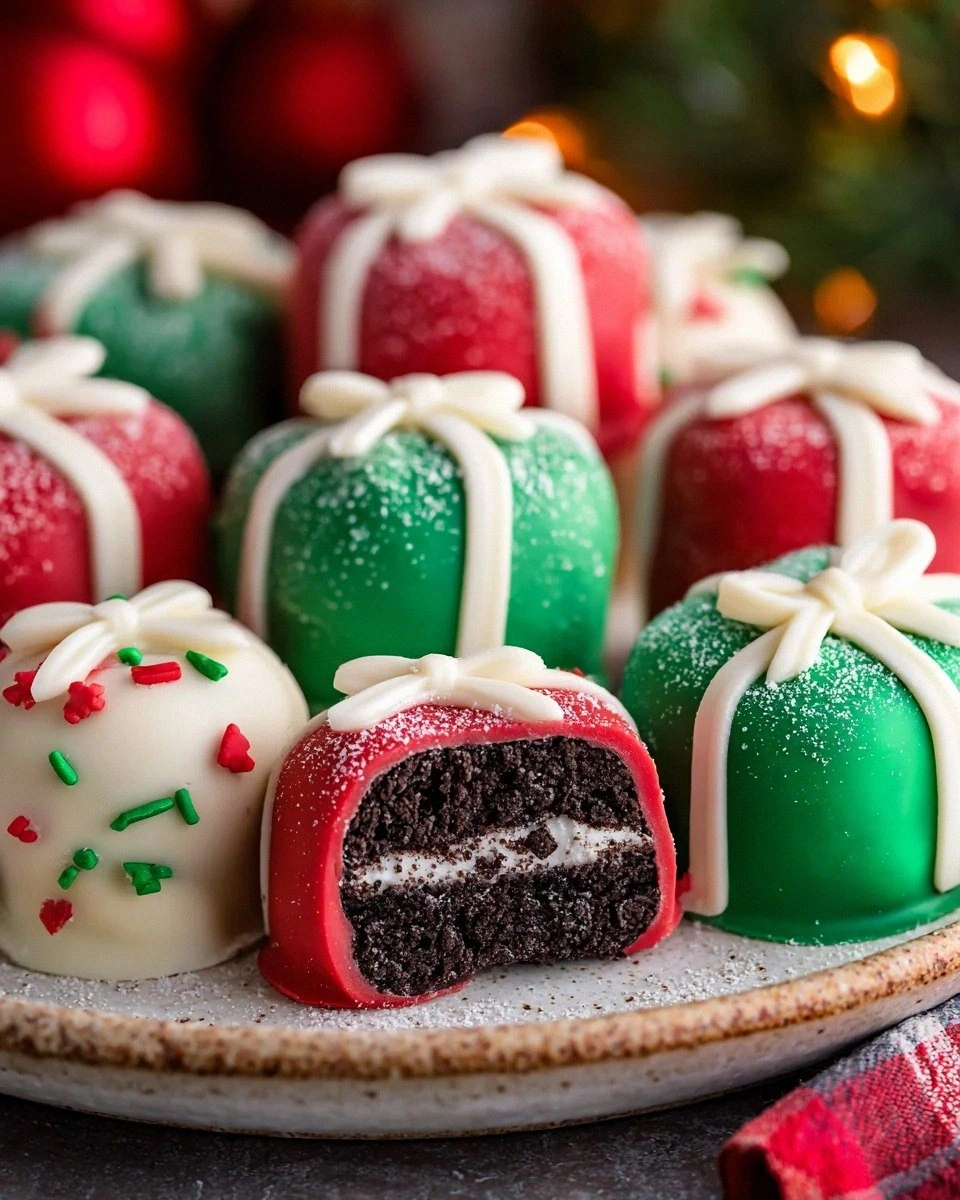
Most Oreo ball recipes I’ve tried either end up dry, bland, or look like they belong in a grocery store aisle rather than a holiday spread. This version, however, is a game‑changer: the combination of regular and red velvet Oreos creates a layered flavor that sings, while the three‑tone candy coating turns each bite into a miniature celebration of red, green, and white. The secret? Dividing the cream cheese and candy melts so each color gets its own dedicated coating, guaranteeing that each ball looks like a perfectly frosted ornament and tastes like a holiday miracle. I’m daring you to taste this and not go back for seconds – it’s that good.
But wait, there’s a twist that most recipes completely miss: a splash of cream cheese in the coating mixture that makes the candy melt adhere like a second skin, preventing that dreaded “crack and slide” problem. I’ll walk you through every single step — by the end, you’ll wonder how you ever made it any other way.
What Makes This Version Stand Out
- Taste: The marriage of classic chocolate Oreo and vibrant red‑velvet Oreo creates a depth that feels like a holiday hug in every bite.
- Texture: A crunchy exterior, a creamy interior, and a melt‑in‑your‑mouth center that shatters like thin ice when you bite.
- Simplicity: Only seven core ingredients, yet each one plays a starring role – no complicated gadgets required.
- Uniqueness: Three‑tone coating (red, green, white) makes these balls the centerpiece of any festive platter, not just another cookie.
- Crowd Reaction: Guests usually gasp, then dive in – it’s the kind of treat that sparks Instagram stories and endless “more please” chants.
- Ingredient Quality: Using real candy melts instead of cheap coating chips gives a glossy finish and authentic flavor.
- Make‑Ahead Potential: You can prep the dough a day ahead and coat them right before serving for maximum freshness.
- Seasonal Flair: The colors scream Christmas, yet the base flavors are timeless – you can swap colors for any holiday.
Alright, let's break down exactly what goes into this masterpiece...
Inside the Ingredient List
The Flavor Base
The heart of these balls is the cookie crumb mixture. Using 22 regular Oreos gives you that classic chocolate‑cream filling, while the 22 red velvet Oreos introduce a subtle cocoa‑red hue and a hint of vanilla that elevates the flavor profile. If you skip the red velvet variety, you’ll lose that festive pop and the final coating won’t have that extra depth of flavor. A great tip: choose Oreos that are still in their original packaging – they stay crisp longer and crush more evenly.
If you’re allergic to wheat, you can substitute gluten‑free chocolate sandwich cookies; just make sure they have a similar texture so the dough holds together. The key is to keep the crumb size consistent – not too fine, not too chunky – because that determines how well the cream cheese binds everything together. I once tried using pre‑crushed crumbs from a bag, and the result was a soggy mess that fell apart like a snowflake in a warm room.
The Texture Crew
The 8 oz of cream cheese is the secret binder that turns crumbly dust into a pliable dough. Splitting it into two portions – one for the dough and one for the coating – ensures the exterior stays glossy while the interior remains buttery. If you use a low‑fat cream cheese, the coating will crack because there isn’t enough fat to create that smooth seal. I recommend letting the cream cheese sit out for at least 30 minutes; a cold block will tear the mixture and create uneven balls.
A quick swap: replace half the cream cheese with mascarpone for an even richer mouthfeel. The extra fat gives a silkier texture, but be careful not to over‑mix – you want a dough that holds together without becoming gummy. When I first tried this swap, the balls were so creamy they practically melted in my mouth, and the guests begged for the recipe.
The Unexpected Star
Candy melts are the unsung heroes of any holiday confection. The 10 oz of red, dark green, and white candy melts each get divided so you can coat the balls in three distinct layers. Using real candy melts (instead of generic coating chips) means you get a high‑gloss finish that catches the light like ornaments on a tree. If you forget to divide the melts and try to color them later, you’ll end up with a muddy brown mess that looks nothing like the festive vision you imagined.
Pro tip: before you melt the candy, add a teaspoon of vegetable oil to each batch – it gives the coating a smoother flow and prevents premature hardening. I once melted white candy melts straight from the bag; they set too quickly, leaving a rough texture that felt like sandpaper on the tongue.
The Final Flourish
White sparkly sanding sugar is optional, but it adds a festive sparkle that makes each ball look like a tiny snow‑kissed ornament. If you’re watching your sugar intake, you can skip it without sacrificing flavor – the candy coating already provides enough sweetness. When I first tried this, I dusted the white‑coated balls with a light layer of sanding sugar, and the visual impact was so strong that even the adults stopped mid‑conversation to admire the tray.
If you can’t find sanding sugar, a pinch of finely ground powdered sugar mixed with a dash of edible glitter works just as well. Just remember to let the coating set completely before sprinkling; otherwise the glitter will stick to the tray instead of the ball.
Everything's prepped? Good. Let's get into the real action...
The Method — Step by Step
First, crush the 22 regular Oreos and 22 red velvet Oreos together. I like to use a sealed zip‑top bag and a rolling pin – give them a good, firm roll until you hear that satisfying crunch. The crumbs should be fine, like powdered snow, but still retain a hint of texture. Tip: Pause every few rolls, open the bag, and shake it to redistribute the crumbs for an even crush.
Kitchen Hack: If you don’t have a rolling pin, use a sturdy wine bottle – the weight does the job just as well.Add half of the softened cream cheese (4 oz) to the crumb mixture. Using a spatula, fold the cheese in until the dough holds together when pressed. It should feel soft but not sticky; if it’s too wet, sprinkle in a tablespoon of powdered sugar. This dough is the foundation of your balls, so take a moment to feel its texture – it should be pliable like play‑dough.
Roll the dough into 1‑inch balls. This is the part where you get to pretend you’re a candy‑making elf. Place the balls on a parchment‑lined tray, spacing them about an inch apart. Once all are formed, chill them in the refrigerator for at least 30 minutes – this firms them up and prevents them from falling apart during coating.
While the balls chill, prepare the candy melts. Divide each 10 oz bag of red, dark green, and white candy melts into two equal portions (5 oz each). Place each portion in a separate microwave‑safe bowl. Add a teaspoon of vegetable oil to each bowl and stir – this ensures a glossy finish. Microwave in 30‑second bursts, stirring between each burst, until fully melted and smooth. Watch Out: Overheating can cause the candy to scorch, turning it bitter.
Watch Out: If the candy melt starts to bubble aggressively, remove it from the microwave and stir vigorously – the bubbles mean it’s too hot.Mix the remaining 4 oz of softened cream cheese into each melted candy portion. This creates a semi‑fluid coating that clings perfectly to the chilled Oreo balls. The mixture will look slightly thick, almost like a frosting that’s just a tad too soft to pipe. Let the mixtures sit for 2‑3 minutes; this allows the cream cheese to integrate fully, giving the coating that buttery sheen.
Coat the chilled balls. Using a fork or a small candy‑coating tool, dip each ball into the red candy melt first, allowing excess to drip off. Place the coated ball back on the parchment sheet. Immediately dip the same ball into the dark green melt, then finish with the white melt. The rapid succession of colors creates a layered effect that looks like a tiny, perfectly painted ornament. If you prefer a single‑color theme, you can skip the other two melts – but trust me, the three‑tone look steals the show.
Kitchen Hack: To speed up the coating process, set up three shallow bowls (one per color) and use a small silicone spatula to scoop and dip – less mess, more speed.Let the coated balls set. After all balls are coated, place the tray in the refrigerator for 15 minutes. This firms the candy shell, giving it a snap when you bite into it. If you’re in a hurry, you can pop them into the freezer for 5 minutes, but watch closely – you don’t want the coating to become brittle.
Optional sparkle: once the coating is firm, dust the white‑coated balls with a light veil of white sparkly sanding sugar. Use a fine mesh sieve to achieve an even dusting. The sugar catches the light and adds a festive sparkle that makes the balls look like they were plucked straight from a Christmas tree.
Serve and enjoy. Arrange the balls on a festive platter, maybe surrounded by fresh cranberries or sprigs of rosemary for a pop of color. Picture yourself pulling this out of the fridge, the whole kitchen smelling incredible, and your guests' eyes widening as they see the glossy, three‑tone treats. This is the moment of truth – the first bite should deliver a crunch, a creamy center, and a burst of holiday flavor that makes you want to shout, “I told you this was the best version you’ll ever make at home!”
That's it — you did it. But hold on, I've got a few more tricks that'll take this to another level...
Insider Tricks for Flawless Results
The Temperature Rule Nobody Follows
Never coat the balls when the candy melt is hotter than 115°F (46°C). At higher temperatures the coating becomes too thin and runs off the ball, creating uneven patches. Keep a candy thermometer handy; when the melt hits the sweet spot, you’ll see a slow, glossy flow that clings like a second skin. I once tried to work at full blast, and the balls ended up looking like melted wax – a total disaster. Let the melt cool just a few seconds before you start dipping, and you’ll get that perfect snap.
Why Your Nose Knows Best
Your sense of smell is the best indicator that the cream cheese has softened enough. When the cheese is truly room temperature, it gives off a faint, milky aroma that’s almost imperceptible. If you can’t smell anything, it’s still too cold and will create lumps in the dough. I’ve learned to trust my nose more than the clock – a few extra minutes on the counter can save you from a crumbly mess.
The 5‑Minute Rest That Changes Everything
After forming the dough balls, let them rest in the fridge for at least 30 minutes, but if you have the time, extend that to an hour. This rest allows the crumbs to fully hydrate, making the balls hold together better during coating. One friend tried to skip the chilling step and ended up with balls that fell apart the moment they hit the candy melt. Patience here is a tiny investment for a massive payoff.
The Double‑Dip Technique
For an ultra‑glossy finish, dip each ball twice in the same color before moving to the next hue. The first dip creates a base layer, the second adds depth and shine. This trick is especially effective with the white melt, giving it a frosted‑glass appearance that looks almost too beautiful to eat. I swear the second dip adds a subtle “wow” factor that guests comment on immediately.
The Secret of the Sparkle
When dusting with sanding sugar, do it in a cool, dry room. Humidity makes the sugar clump, ruining the even sparkle. I keep a small fan running in the kitchen while I dust, and the sugar settles like fresh snowfall. If you’re in a humid climate, place the tray in the freezer for a minute before dusting – the cold surface helps the sugar adhere without clumping.
Creative Twists and Variations
This recipe is a playground. Here are some of my favorite ways to switch things up:
Peppermint Burst
Swap the white candy melt for a peppermint‑flavored white melt and add crushed candy canes to the sanding sugar. The result is a cool, minty surprise that pairs perfectly with the chocolatey Oreo base. Ideal for a post‑dinner treat when you want a refreshing palate cleanser.
Caramel Drizzle
After the balls have set, drizzle a thin ribbon of caramel sauce over the red‑coated ones. The salty‑sweet caramel adds a luxurious layer that makes the red color pop even more. I love serving these with a side of whipped cream for an extra indulgent bite.
Nutty Crunch
Fold finely chopped toasted pecans or almonds into the crumb mixture before forming the balls. The nuts add an unexpected crunch that contrasts beautifully with the smooth candy coating. This variation works great for those who love a bit of texture in their sweets.
Vegan Velvet
Replace the cream cheese with vegan cream cheese and use dairy‑free candy melts. The flavor stays true to the original, and you get a plant‑based version that still looks stunning. Just be sure the vegan cream cheese is at room temperature; otherwise the dough will be crumbly.
Spiced Holiday
Add a pinch of ground cinnamon and a dash of ground nutmeg to the crumb mixture. The warm spices give the balls a cozy, holiday‑spice undertone that makes them perfect for a winter gathering. Pair them with a hot mulled wine for an unforgettable tasting experience.
Storing and Bringing It Back to Life
Fridge Storage
Place the finished balls in an airtight container lined with parchment paper. They will stay fresh for up to 5 days in the refrigerator. Keep the container in the coldest part of the fridge to prevent the candy coating from softening. If you notice any condensation, gently pat the balls dry with a paper towel before resealing.
Freezer Friendly
These treats freeze exceptionally well. Arrange them on a baking sheet in a single layer, flash‑freeze for 30 minutes, then transfer to a zip‑top freezer bag. They’ll keep for up to 2 months. When you’re ready to serve, let them thaw in the fridge for an hour, then give them a quick 2‑minute blast in a 300°F oven to revive the crisp coating.
Best Reheating Method
If the coating has lost its snap, place the balls on a parchment‑lined tray and warm them in a 300°F oven for 5‑7 minutes. Add a tiny splash (about a teaspoon) of water to the tray before heating – the steam helps the candy melt regain its glossy sheen without becoming sticky. Serve warm for a melty interior that feels like a holiday hug.