I was halfway through a marathon of cookie recipes, scrolling through endless variations of chocolate chip, when my oven alarm blared and a half‑baked batch of classic cookies lay scorched on the tray. The disappointment was almost cinematic—flaky, burnt edges, and a dough that had turned from golden to gray in seconds. That moment was the spark that pushed me to chase the perfect bear‑shaped cookie, one that would be as visually adorable as it is irresistibly tasty. I’ve spent months tweaking dough ratios, playing with temperatures, and even experimenting with the type of chocolate chip, until I landed on a version that feels like a warm hug in bite‑sized form. If you’ve ever felt the sting of a cookie mishap, trust me: this is hands down the best version you’ll ever make at home.
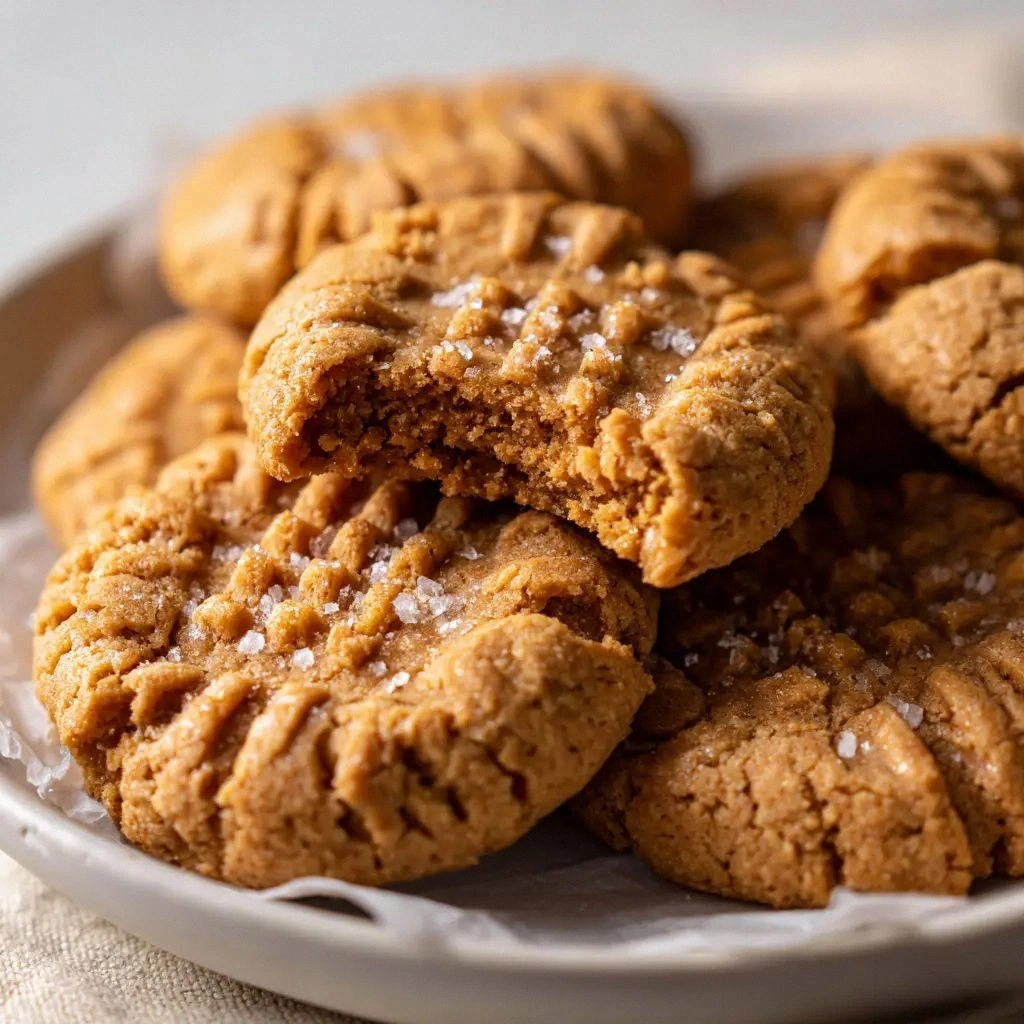
Picture the kitchen: the air thick with the buttery scent of melted butter mingling with vanilla’s sweet whisper. The sound of the oven timer ticking, the rhythmic click of the dough scooping spoon, and the gentle clink of the cooling rack. The texture of the dough—soft, slightly sticky, yet firm enough to hold its shape—hints at the cookie’s future. As you press a piece into the dough, the tiny chocolate chips glisten like little black specks of joy. When the first cookie comes out, its edges are crisp, almost crackling, while the center remains decadently gooey, a contrast that sings to the senses.
What sets this recipe apart is the meticulous balance between sweetness and salt, the subtle crunch from the cornstarch, and the playful bear‑face design that turns every bite into a mini celebration. The dough’s structure is engineered to hold the chocolate chips without sinking, thanks to the precise blend of all‑purpose flour and cornstarch. The butter’s coldness is retained until just before baking, ensuring a tender crumb that melts in your mouth. I dare you to taste this and not go back for seconds, because the flavor profile is a perfect harmony of caramelized sugar, buttery richness, and chocolatey depth. The result is a cookie that looks adorable, tastes divine, and leaves you craving another bite—no wonder it’s a crowd‑pleaser at parties.
This isn’t just another cookie recipe; it’s a culinary confidence booster. I’ll be honest—half the batch went straight into my mouth before anyone else got to try it. The secret? A few small tweaks that might seem trivial but make all the difference. I’ve hidden a few tricks in the steps, so stay with me here—this is worth it. Let me walk you through every single step, and by the end, you’ll wonder how you ever made it any other way.
What Makes This Version Stand Out
- Taste: The combination of brown and granulated sugar creates a caramelized sweetness that pairs perfectly with the chocolate chips. The slight saltiness lifts the flavor profile, making each bite unforgettable.
- Texture: Cornstarch lightens the dough, giving the cookies a tender, melt‑in‑your‑mouth crumb while the butter keeps them chewy. The edges crisp up just enough to offer a satisfying crunch.
- Simplicity: With only ten ingredients, the recipe is approachable for beginners and seasoned bakers alike. No special equipment is required—just a mixing bowl, a spoon, and an oven.
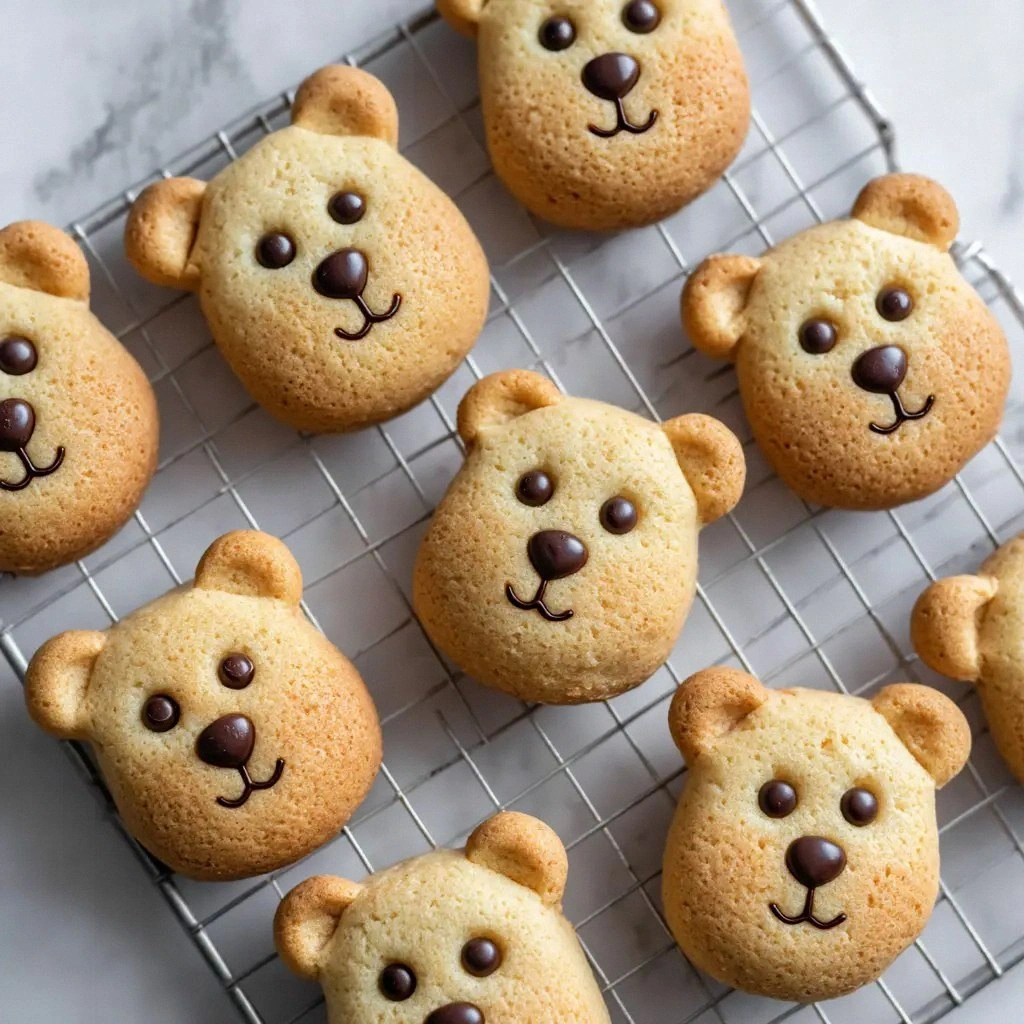
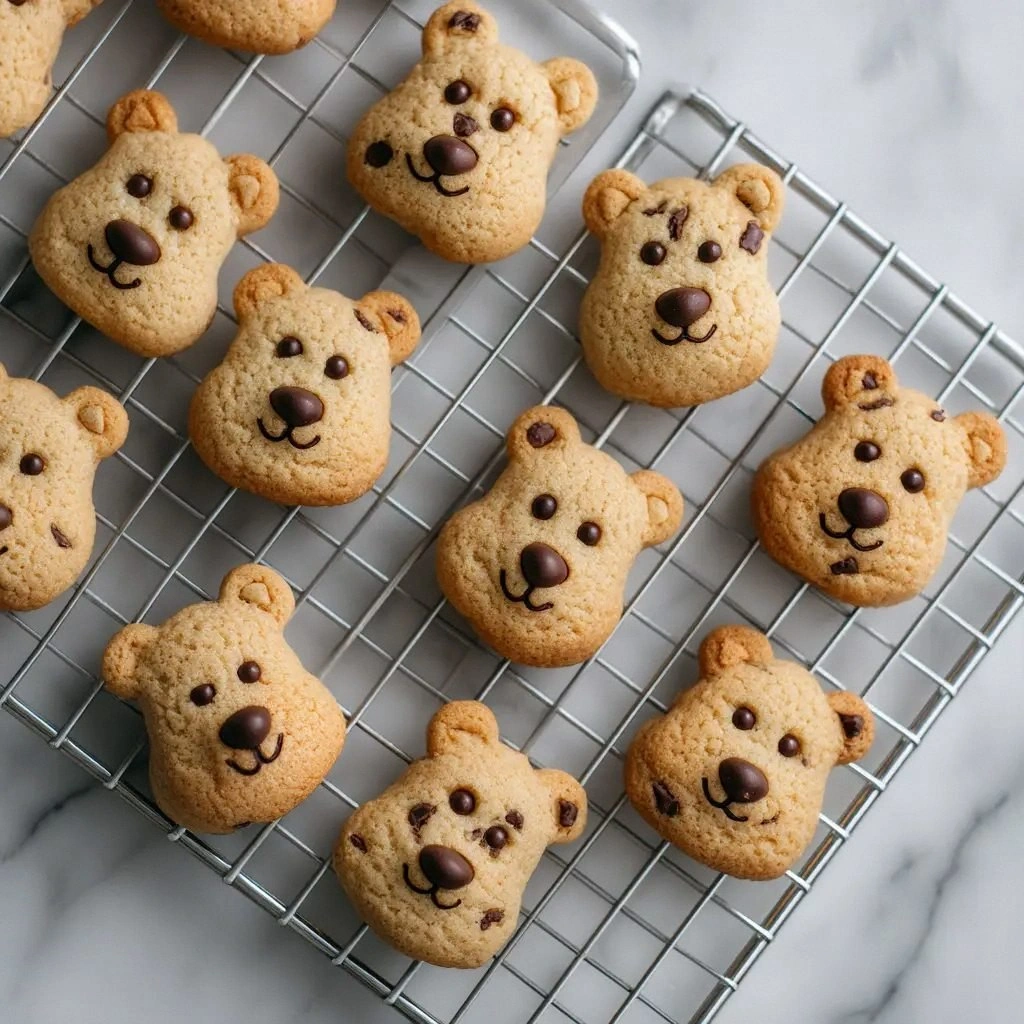
- Uniqueness: The bear‑face design is achieved with a simple pinch of chocolate chips and a dash of vanilla, turning ordinary cookies into playful treats.
- Ingredient Quality: Using unsalted butter and high‑quality chocolate chips ensures a richer flavor that can’t be matched by generic brands.
- Make‑Ahead Potential: The dough can be refrigerated up to 24 hours, allowing you to bake fresh cookies whenever the mood strikes.
Alright, let's break down exactly what goes into this masterpiece…
Inside the Ingredient List
The Flour Blend
The base of the dough starts with 1.5 cups all‑purpose flour, which provides structure and a neutral canvas for the other flavors. Adding 2 tbsp of cornstarch softens the gluten network, giving the cookies a tender crumb that doesn’t become too tough. If you prefer a slightly denser cookie, you can replace 1/4 cup of the flour with whole wheat flour, but the texture will shift toward a nuttier bite. Choosing a flour with a protein content around 10% ensures the cookies rise just enough to stay fluffy without puffing up excessively.
The Sweet Symphony
Brown sugar (0.5 cup) introduces molasses notes that caramelize during baking, while 0.25 cup granulated sugar keeps the dough from becoming overly sticky. Together, they create a balanced sweetness that complements the chocolate chips. If you’re watching your sugar intake, you can swap the granulated sugar for a sugar substitute that measures cup‑by‑cup, but be aware the texture may change slightly. For a deeper flavor, try using dark brown sugar, which has a richer molasses content.
The Butter and Egg
Half a cup of cold, unsalted butter is the backbone of the cookie’s flavor and texture. The coldness of the butter ensures that the dough remains solid until baking, which prevents spreading and keeps the cookies thick. The single large egg binds the ingredients together and adds a subtle richness. If you’re vegan, a flax egg (1 tbsp ground flaxseed + 3 tbsp water) can substitute, though the cookies will be slightly denser.
The Flavor Finisher
A teaspoon of vanilla extract brings warmth and depth, acting as a flavor enhancer that rounds out the sweetness. The 1 cup of mini chocolate chips is the star, providing bursts of chocolate in every bite. If you like a chocolate‑heavy cookie, add an extra 1/4 cup of chips. For a twist, try using white chocolate chips or a mix of dark and milk chocolate for varied flavor layers.
Everything's prepped? Good. Let's get into the real action…
The Method — Step by Step
- Preheat your oven to 350°F (175°C) and line a baking sheet with parchment paper or a silicone mat. While the oven warms, combine the all‑purpose flour, cornstarch, baking soda, and salt in a bowl, whisking until the dry ingredients are evenly distributed. This ensures that the leavening agent is spread throughout the dough, preventing uneven rise. As you mix, you’ll notice the dry mix taking on a light, almost sandy texture that’s ready for the butter.
- In a separate bowl, cream the cold butter with the brown and granulated sugars until the mixture is pale and fluffy. The key to a light crumb is to keep the butter cold; if it melts too quickly, the dough will spread. Use an electric mixer on medium speed for 2–3 minutes, or beat by hand until the sugar dissolves. The mixture should feel airy, like a smooth mousse.
- Beat in the egg and vanilla extract, mixing until fully incorporated. The egg adds moisture and structure, while vanilla elevates the overall flavor. Keep the mixture smooth; any lumps will affect the texture. After this step, you should have a glossy batter that clings lightly to the back of a spoon.
- Gently fold the dry flour mixture into the wet batter, stirring until just combined. Be careful not to overmix; the dough should remain slightly sticky. The moment the flour is incorporated, the dough will thicken and become easier to handle. This is also the point where the dough’s texture shifts from liquid to a workable consistency.
- Fold in the mini chocolate chips, ensuring they’re evenly distributed. The chips should be nestled throughout the dough, not just on top. This step guarantees that every bite contains a chocolate burst. If you prefer a more concentrated chocolate flavor, reserve 1/4 cup of chips for topping each cookie before baking.
- Using a small cookie scoop or spoon, portion the dough onto the prepared baking sheet, spacing them about 2 inches apart. The dough will spread slightly, so keep them well‑spaced to avoid merging. If you want a more bear‑like shape, press a chocolate chip into the top of each cookie to create the “eyes.”
- Bake for 12–14 minutes, or until the edges are golden and the centers appear set but still soft. The cookies should smell like warm butter and chocolate, a scent that will fill the kitchen. When you lift a cookie, the top should be slightly domed, and the bottom firm. Let them cool on the sheet for 5 minutes before transferring to a wire rack to finish cooling.
That’s it—you did it. But hold on, I’ve got a few more tricks that’ll elevate these cookies to another level. Keep reading, and you’ll learn how to make them even more irresistible.
Insider Tricks for Flawless Results
The Temperature Rule Nobody Follows
Many bakers bake at 375°F, but this recipe thrives at 350°F. A lower temperature allows the cookies to bake evenly, preventing the edges from over‑browning while the centers finish cooking. This subtle tweak is the secret behind the cookie’s perfect balance of crisp and chewy. If you’re tempted to raise the heat for a quicker bake, pause and consider the texture trade‑off.
Why Your Nose Knows Best
Before you lift a cookie, trust your nose. The aroma of butter and chocolate is a reliable indicator of doneness. When the scent is rich and buttery, the cookie is likely ready to come out of the oven. If the smell is still raw or sweet, give it a few more minutes. Your nose is the best judge of flavor.
The 5‑Minute Rest That Changes Everything
After baking, let the cookies rest on the sheet for exactly five minutes. This pause allows the structure to set and the moisture to redistribute, preventing a crumbling crumb. Skipping this step can result in cookies that break apart when you try to pick them up. The five minutes also give the chocolate a chance to slightly soften, enhancing the gooey center.
The Chill‑Then‑Bake Method
Refrigerate the dough for at least 30 minutes before baking. Chilling the dough firms the butter, which reduces spread and helps the cookies maintain their shape. This method is especially useful if you’re baking a large batch. If you’re short on time, a quick 10‑minute chill still provides noticeable benefits.
The Butter‑Temperature Trick
Keep the butter cold but not frozen. If the butter is too hard, it won’t cream properly; if it’s too soft, the cookies will spread. A quick test: press the butter with your thumb; it should give slightly but not melt. This balance ensures a tender, flavorful cookie that doesn’t become greasy.
Creative Twists and Variations
This recipe is a playground. Here are some of my favorite ways to switch things up:
Nutty Surprise
Add 1/2 cup of chopped pecans or walnuts to the dough. The nuts provide a crunchy contrast to the chewy cookie and add a subtle earthy flavor. The extra texture makes each bite more interesting, especially for guests who love a nutty bite. Pair with a drizzle of honey for a sweet‑savory combo.
Spiced Up
Incorporate 1/4 tsp of cinnamon or a pinch of nutmeg into the dry mix. The spices bring warmth and depth, turning the cookies into a cozy autumn treat. The spices also complement the chocolate chips, creating a harmonious flavor profile. Serve with a splash of milk for an extra indulgent experience.
Mocha Morsels
Replace half of the mini chocolate chips with cocoa nibs and add 1 tsp of instant espresso powder to the dough. The espresso enhances the chocolate flavor, giving the cookies a subtle coffee kick. The nibs add a crunchy texture and a slightly bitter edge. These cookies pair wonderfully with a latte or cappuccino.
Salted Caramel Delight
Swap the brown sugar for a caramel sauce, and sprinkle a pinch of sea salt on top before baking. The caramel adds a buttery sweetness, while the salt amplifies the flavor. The result is a cookie that feels indulgent yet balanced. Serve with a scoop of vanilla ice cream for a dessert that feels like a treat.
Vegan Version
Use a vegan butter substitute, a flax egg, and sugar alternatives. Replace the mini chocolate chips with dairy‑free chocolate chips. The texture will be slightly denser, but the flavor remains rich and satisfying. These cookies are perfect for guests who prefer plant‑based options.
Storing and Bringing It Back to Life
Fridge Storage
Store cooled cookies in an airtight container at room temperature for up to 5 days. The airtight seal keeps the cookies from drying out and preserves their chewy centers. If you notice the cookies becoming hard, place a slice of bread in the container; the bread will release moisture that restores softness. For a quick refresh, microwave a cookie for 10 seconds, then let it cool on a paper towel.
Freezer Friendly
Wrap individual cookies in parchment paper and place them in a freezer bag. They will stay fresh for up to 3 months. When you’re ready to enjoy, let them thaw at room temperature for 30 minutes. The cookies will regain their original texture and flavor. This method is ideal for batch baking and meal prepping.
Best Reheating Method
Reheat frozen or chilled cookies in a preheated oven at 300°F for 8–10 minutes. The low temperature warms the cookie without overcooking it. Before reheating, add a tiny splash of water to the bottom of the baking sheet; the steam will help keep the cookies moist. After reheating, let them cool for a minute before enjoying the perfectly restored gooey center.