What Makes This Version Stand Out
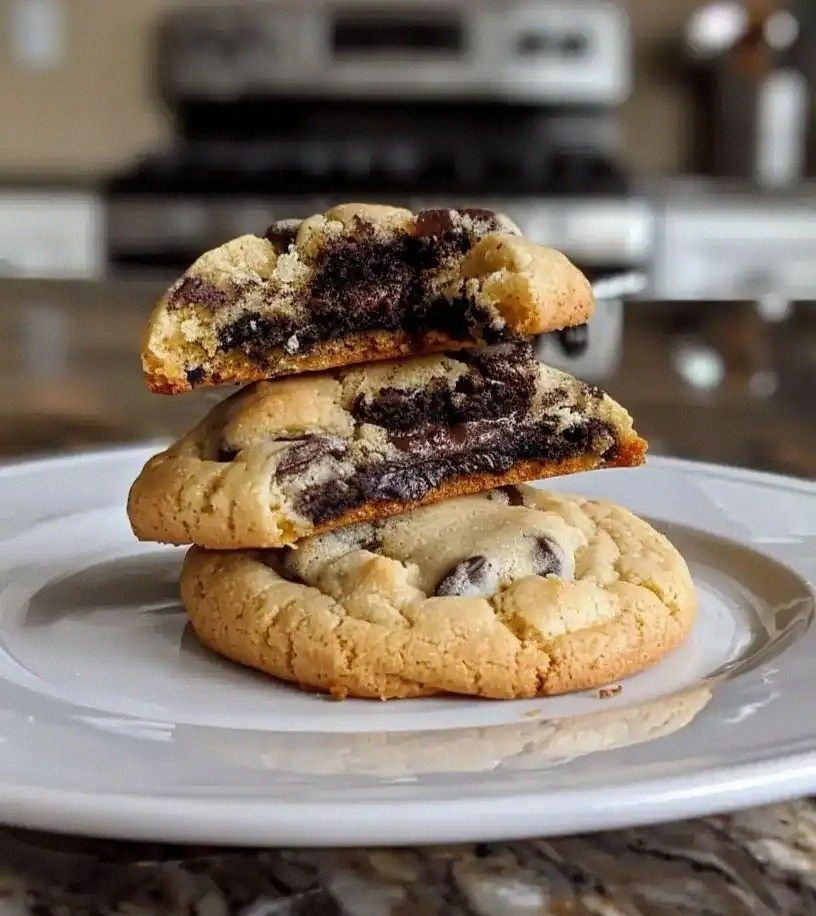
- Flavor: The blend of dark chocolate chips and crushed Oreos creates a complex taste profile that balances sweet, salty, and buttery notes. The chocolate melts slightly in the center, while the Oreo crumbs provide a satisfying crunch.
- Texture: The cookies achieve a perfect balance of chewy center and crisp edges. The addition of baking soda lifts the dough without making it too airy, so the cookie stays tender.
- Simplicity: Every step is straightforward, no fancy equipment required. All you need is a mixing bowl, a spoon, and a baking sheet.
- Uniqueness: Few cookie recipes combine Oreo crumbs with chocolate chips, making this a standout dessert that will surprise and delight.
- Crowd Reaction: Friends and family consistently ask for the recipe after the first batch. The cookies become the highlight of any gathering.
- Ingredient Quality: Using high‑quality, unsalted butter and premium chocolate chips ensures the best flavor. The Oreos are the classic original, providing that iconic taste.
- Cooking Method: The method emphasizes proper creaming, gradual mixing, and precise baking to lock in flavor and texture.
- Make‑Ahead Potential: The dough can be refrigerated for up to 48 hours, and the cookies hold up well in an airtight container for a week.
Alright, let’s break down exactly what goes into this masterpiece…
Inside the Ingredient List
The Flavor Base
Unsalted butter is the cornerstone of any cookie, providing richness and a golden crust. Using 1 cup of softened butter ensures the dough remains tender while still offering that buttery snap on the edges. If you’re watching sodium, replace the butter with a 50/50 butter‑oil blend, but be aware the cookies will be slightly less crisp.
Granulated sugar and packed brown sugar work together to create a caramelized sweetness that lingers. The ¾ cup of each balances sweetness with the subtle molasses flavor from the brown sugar. If you prefer a lighter cookie, reduce the brown sugar by a quarter cup, but you’ll lose some of the depth that makes these cookies unforgettable.
Vanilla extract adds a warm, aromatic layer that complements the chocolate and cookie crunch. A single teaspoon is enough to elevate the flavor profile without overpowering the other ingredients. For a twist, try vanilla bean paste or almond extract for a different aromatic note.
The Texture Crew
All‑purpose flour is the backbone of the cookie’s structure. The 2¼ cups provide just enough gluten development to hold the cookie together while still staying soft. If you want a chewier cookie, increase the flour by ¼ cup; if you prefer a crisper cookie, reduce it by the same amount.
Baking soda is the leavening agent that gives the cookie its lift and helps spread it evenly. One teaspoon is sufficient for 4 servings, but if you’re baking in a high‑altitude kitchen, reduce it by ¼ teaspoon to avoid excessive rise.
Salt is the flavor enhancer that balances sweetness. The ½ teaspoon of salt brings out the richness of the chocolate and the crunch of the Oreos. A pinch of salt can be used if you’re sensitive to sodium, but you’ll need to taste the dough first to ensure it’s not bland.
The Unexpected Star
Chocolate chips are the sweet heart of the cookie, providing a melt‑in‑your‑mouth experience. Using 1 cup ensures each bite has a generous chocolate presence. For a more intense chocolate flavor, swap in semi‑sweet or dark chocolate chunks.
Crushed Oreo cookies are the secret weapon that gives the cookie its signature crunch and a hint of caramelized sugar. The 1 cup of crushed Oreos adds texture and a familiar, nostalgic flavor. If you’re looking for a healthier twist, use a sugar‑free Oreo or a chocolate‑crunch cookie.
Everything’s prepped? Good. Let’s get into the real action…
The Method — Step by Step
- Preheat your oven to 350°F (175°C) and line two baking sheets with parchment paper. This step ensures the cookies bake evenly and prevents sticking. The timer should be set for 12 minutes, but keep an eye on the first batch to fine‑tune the time for your oven. As the dough starts to puff, you’ll notice a faint toasty aroma that signals the batter is ready.
- In a large mixing bowl, combine the softened butter, granulated sugar, and brown sugar. Cream them together until the mixture is light and fluffy, using a whisk or a stand mixer on low speed. This process incorporates air, which will help the cookies rise slightly and develop a tender crumb. The mixture should look pale and airy, like a fluffy cloud.
- Add the eggs one at a time, beating well after each addition. The first egg will create a smooth base, while the second will help bind the dough. If you’re using a stand mixer, keep the speed low to avoid splattering. Watch for the mixture to thicken slightly after each egg; this indicates proper incorporation.
- Stir in the vanilla extract and mix until fully incorporated. The vanilla’s aroma should fill the kitchen, hinting at the sweet flavors to come. A good mix will be smooth with no lumps, ensuring even distribution of flavor.
- Whisk the flour, baking soda, and salt in a separate bowl. Gradually add the dry mixture to the wet mixture, mixing on low speed until just combined. Overmixing can lead to tough cookies, so stop as soon as the flour is incorporated. The dough should be slightly sticky but manageable.
- Drop rounded tablespoonfuls of dough onto the prepared baking sheets, spacing them about 2 inches apart. This spacing allows the cookies to spread evenly without merging into one another. The dough should be slightly flattened; if it’s too round, it may not spread properly.
- Bake for 12–14 minutes, or until the edges are golden brown and the centers are just set. The cookies will still look a bit soft in the middle; they will firm up as they cool. If your oven runs hot, reduce the baking time by a minute or two to avoid over‑browning.
- Allow the cookies to cool on the baking sheet for 5 minutes before transferring them to a wire rack. This short cooling period lets the cookies set, preventing them from breaking apart. Once on the rack, let them cool completely for at least 15 minutes.
- Store the cooled cookies in an airtight container at room temperature for up to a week. The cookies will stay fresh and chewy for several days. If you notice the cookies starting to soften, add a slice of bread to the container; the bread will absorb excess moisture.
That’s it — you did it. But hold on, I’ve got a few more tricks that’ll take this to another level…
Insider Tricks for Flawless Results
The Temperature Rule Nobody Follows
Many bakers bake at 375°F, but that can cause the cookies to spread too much. Baking at 350°F keeps the cookies from spreading too quickly, preserving their shape and texture. If you prefer a slightly crispier cookie, raise the temperature to 375°F for the last 2 minutes of baking, but keep a close eye on the edges.
Why Your Nose Knows Best
Your sense of smell is the most reliable indicator of cookie readiness. When the aroma shifts from buttery to caramelized, the cookies are almost done. Don’t rely solely on the timer; trust your nose to catch that perfect moment.
The 5‑Minute Rest That Changes Everything
After removing the cookies from the oven, let them rest on the sheet for 5 minutes. This short pause allows the cookies to set, making them easier to move without breaking. I’ve found that skipping this step often results in fragile cookies that crumble when you try to lift them.
The Perfect Dough Consistency
The dough should be soft but not sticky. If it’s too sticky, add a tablespoon of flour; if it’s too dry, add a splash of milk. The right consistency ensures even baking and a tender crumb.
The Secret Ingredient: A Pinch of Cinnamon
Adding a pinch of cinnamon to the dry mix gives the cookies a subtle warmth that pairs beautifully with chocolate. This small tweak elevates the flavor profile and makes the cookies feel more complex. If you’re sensitive to spices, start with ¼ teaspoon and adjust to taste.
The Chill Trick
Refrigerating the dough for 30 minutes before baking locks in the flavors and improves the cookie’s texture. The dough becomes easier to handle and results in a more uniform cookie. If you’re short on time, skip the chill step, but you’ll miss out on the depth of flavor.
Creative Twists and Variations
This recipe is a playground. Here are some of my favorite ways to switch things up:
Nutty Delight
Swap the chocolate chips for chopped walnuts or pecans. The nuts add a buttery crunch that pairs wonderfully with the Oreo crumbs. Toast the nuts beforehand for an extra layer of flavor.
Moisture‑Rich Chocolate
Add 2 tablespoons of dark chocolate ganache to the dough. The ganache melts during baking, creating pockets of molten chocolate that make the cookie feel decadent. Be careful not to add too much ganache, or the dough may become too wet.
Spiced Variation
Incorporate 1 teaspoon of pumpkin spice or chai spice blend into the dry mix. The spices add warmth and depth, making the cookies perfect for fall or winter gatherings.
Coconut Crunch
Replace half of the Oreo crumbs with shredded coconut. The coconut adds a tropical note that complements the chocolate, while still providing that satisfying crunch.
Chocolate‑Only Cookie
Omit the Oreo crumbs entirely for a classic chocolate chip cookie. The result is a chewy, buttery cookie with a rich chocolate center that still feels indulgent.
Sugar‑Free Sweetness
Swap the granulated and brown sugars for a sugar substitute like erythritol or stevia. Use a 1:1 ratio for granulated sugar, but adjust the brown sugar substitution to taste. The cookies will still be deliciously sweet, with a lower calorie count.
Storing and Bringing It Back to Life
Fridge Storage
Place the cookies in an airtight container in the refrigerator for up to 5 days. The cold environment preserves the cookies’ freshness and keeps the chocolate from melting. When you’re ready to serve, let them sit at room temperature for 10 minutes to soften slightly.
Freezer Friendly
Wrap each cookie individually in parchment paper and place them in a freezer bag. Freeze for up to 3 months. To thaw, leave the cookies at room temperature for 15 minutes or microwave on low for 10 seconds. The cookies will return to their original texture.
Best Reheating Method
To revive frozen cookies, place them on a baking sheet and bake at 300°F (150°C) for 5–7 minutes. Add a tiny splash of water to the bottom of the pan to create steam, which helps rehydrate the cookie and restores its softness. For a quick snack, microwave on low for 10 seconds; the cookie will warm up without losing its crunch.