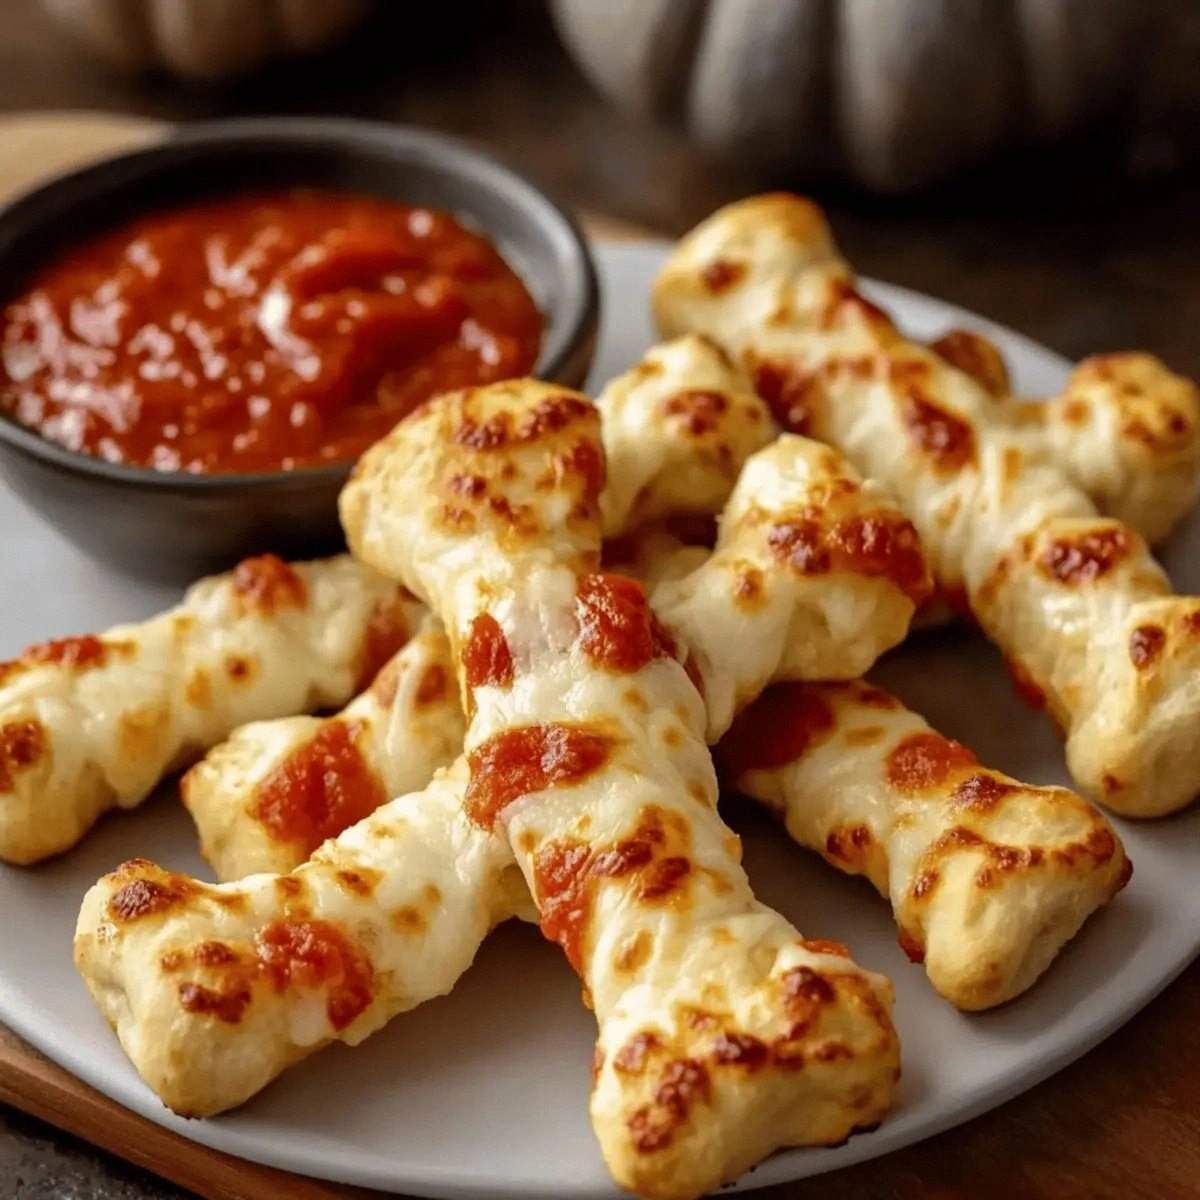
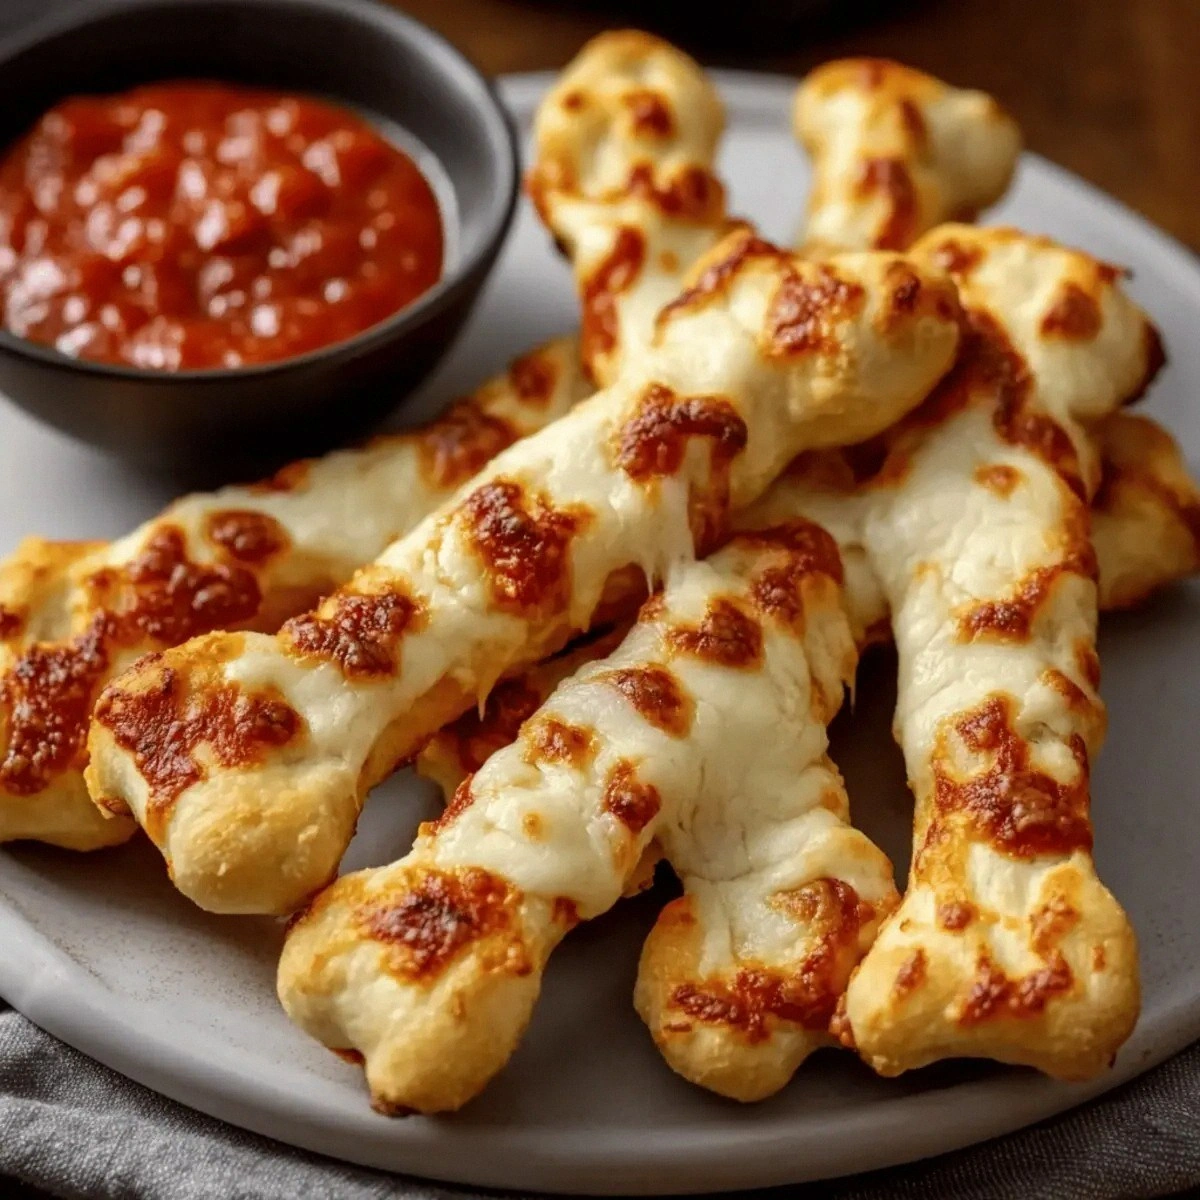
I still remember the Halloween party disaster of 2019 like it happened yesterday. There I was, standing in my kitchen at 2 AM, surrounded by deflated meringue ghosts and sugar cookies that looked like they'd been through a zombie apocalypse. My friends were arriving in eight hours for the annual spooky bash, and I had absolutely nothing decent to serve. That's when inspiration struck harder than a vampire on prom night — why not turn simple breadsticks into something that would make everyone scream with delight rather than horror? What emerged from my oven that fateful morning changed my Halloween hosting game forever: golden, cheesy breadstick bones that snap with satisfying crispness, revealing molten mozzarella centers that stretch like spider silk. The first batch disappeared in minutes, with my friend Marcus literally guarding the plate like a gargoyle. I dare you to taste these and not go back for thirds — yes, thirds, because seconds happen before you can even blink.
Picture yourself pulling these out of the oven, the whole kitchen smelling like a haunted Italian bakery where the ghosts have excellent taste in cheese. The aroma of buttery, garlicky dough mingles with the nutty perfume of Parmesan, creating an olfactory experience that'll have neighbors knocking on your door pretending they're trick-or-treating. The magic happens when you twist the dough just right — those knobby joints appear like something from a medical skeleton, but infinitely more appetizing. I'll be honest — I ate half the batch before anyone else got to try it, standing over the baking sheet doing that little hot-food dance while cheese strings stretched from my mouth like some kind of delicious cobweb. This isn't just another Halloween recipe; this is the recipe that'll make you legendary among your friend group, the one they beg you to bring to every October gathering until you're practically contractually obligated.
Most recipes get this completely wrong by using pre-made breadstick dough that tastes like cardboard had a baby with disappointment. They skip the crucial step of double-cheese layering, resulting in sad, dry bones that crack like stale pretzels instead of the tender-chewy masterpieces we're after. Here's what actually works: fresh pizza dough that's been allowed to relax just enough to stretch without snapping, a butter coating that includes just a whisper of garlic powder, and the game-changing technique of stuffing mozzarella inside while encrusting Parmesan outside. The contrast creates these incredible textural moments — crispy edges that shatter like thin ice over a gooey, stretchy center that pulls apart like edible elastic. Stay with me here — this is worth it, and by the end, you'll wonder how you ever made it any other way.
The secret weapon? It's all in the bone-shaping technique that takes thirty seconds to master but looks like you attended culinary school in Transylvania. We're creating little dough ropes that puff into perfect skeletal shapes, complete with knuckles and joints that'll have kids and adults equally obsessed. Okay, ready for the game-changer? Let me walk you through every single step — by the end, you'll have a party trick that works for Halloween movie marathons, office potlucks, or those nights when you just need something comforting that happens to look like it belongs in a haunted house.
What Makes This Version Stand Out
Before we dive into the floury depths of this masterpiece, let me hit you with the hard facts about why these breadstick bones will ruin you for all other Halloween snacks. This isn't hyperbole — this is culinary science mixed with pure spooky magic.
- Taste Explosion: The combination of nutty Parmesan on the outside with molten mozzarella hiding inside creates a flavor bomb that makes regular breadsticks taste like sad, dry crackers in comparison. Each bite delivers a one-two punch of sharp and creamy that'll make your taste buds do the monster mash.
- Texture Perfection: We're achieving the impossible here — shatteringly crisp edges that give way to a tender, almost focaccia-like interior. The contrast between the crunchy exterior and the soft, cheese-filled center is what separates amateur hour from professional-level snacking.
- Simplicity Factor: Despite looking like you spent hours sculpting each bone by hand, this recipe comes together faster than a vampire avoiding sunrise. Twenty minutes of active work, thirty minutes of baking, and you're the Halloween hero without breaking a sweat.
- Visual Impact: These don't just taste incredible — they photograph like edible art. The golden-brown bones with their knobby joints create instant Instagram gold that'll have your followers convinced you're secretly a food stylist.
- Crowd Psychology: There's something about food that looks like bones that bypasses adult sophistication and hits pure childlike joy. Watch grown professionals turn into giddy kids, making skeleton puns while fighting over the last piece.
- Ingredient Integrity: Using real butter, fresh cheeses, and quality dough makes these taste like something from an upscale Italian restaurant that happens to be haunted. No artificial flavors or processed shortcuts here — just pure, honest deliciousness.
- Make-Ahead Magic: You can prep these bones up to the shaping step, refrigerate overnight, and bake fresh when guests arrive. The flavors actually improve as the dough relaxes and the cheese seasons from within.
Alright, let's break down exactly what goes into this masterpiece, because understanding your ingredients is what separates the snack-time champions from the kitchen also-rans.
Inside the Ingredient List
Great recipes aren't just about throwing ingredients together — they're about understanding how each component contributes to the final symphony of flavor and texture. Let's dissect this like we're performing an autopsy on deliciousness itself.
The Foundation Builders
All-purpose flour forms the structural backbone of our bones, quite literally. It provides the gluten network that gives these breadsticks their satisfying chew while still allowing for that crucial crackle on the outside. The protein content in regular AP flour hits the sweet spot — too little protein and your bones collapse like a skeleton without ligaments, too much and they become tough enough to use as actual weapons. When measuring your flour, use the spoon-and-level method instead of scooping directly from the bag, which can add up to 25% more flour and turn your bones into bread bricks. If you've ever struggled with dense, heavy breadsticks, you're not alone — and I've got the fix right here.
The Dough Dream Team
Pizza dough is our secret weapon for achieving that perfect balance between crispy and chewy. The fermentation that's already happened in store-bought pizza dough gives our bones a subtle tang that elevates them beyond ordinary breadsticks. When selecting your dough, look for the fresh kind in the refrigerated section rather than the canned stuff — the difference in flavor is like comparing a vintage wine to grape soda. Let the dough come to room temperature for thirty minutes before shaping; cold dough fights back and creates misshapen bones that look like they've been through a zombie blender. The elasticity of properly tempered dough allows you to stretch and twist without tears, creating those characteristic joint bulges that make these look anatomically correct.
The Fat Factor
Unsalted butter serves multiple masters in this recipe — it carries fat-soluble flavors, creates steam for lift, and develops that gorgeous golden-brown color through the Maillard reaction. Using unsalted butter gives you complete control over seasoning; salted butter varies wildly between brands and can throw off your flavor balance like a poltergeist in a china shop. The butter needs to be softened, not melted, so it creams properly with the garlic and creates a spreadable paste that won't make your dough soggy. Room-temperature butter absorbs flavors better, acting like a sponge for the garlic and any herbs you decide to add to the mix.
The Cheese Champions
Parmesan cheese brings the umami bomb that makes these bones addictive rather than just good. The aged complexity of real Parmigiano-Reggiano creates little crispy frico edges around your bones that shatter like candy glass. Mozzarella provides the Instagram-worthy cheese pull that makes everyone at your party stop mid-conversation to watch you break one apart. The key is using low-moisture mozzarella for the stuffing — fresh mozzarella will release too much liquid and create soggy bone centers, which is about as appealing as it sounds. Pre-shredded cheese contains anti-caking agents that prevent smooth melting, so buy blocks and shred yourself for the ultimate cheese experience.
The Flavor Amplifier
Marinara sauce isn't just for dipping — it's the acidic counterpoint that cuts through the richness of all that cheese and butter. The bright tomato flavor prevents palate fatigue, allowing you to demolish way more breadstick bones than you'd think humanly possible. Choose a marinara that's chunky rather than smooth; the bits of tomato and herbs create little flavor bombs that complement rather than compete with your bones. Warm the sauce slightly before serving — cold marinara against hot breadsticks creates an unpleasant temperature contrast that'll have your guests making faces like they just bit into a trick instead of a treat.
Everything's prepped? Good. Let's get into the real action — but first, feast your eyes on what we're about to create.
The Method — Step by Step
Now we're getting to the good stuff — the actual creation of these spooky masterpieces. Roll up your sleeves, because we're about to get hands-deep in dough and transform simple ingredients into Halloween legend.
- Start by preheating your oven to 425°F — this temperature is crucial for achieving that golden-brown exterior while ensuring the inside cooks through without becoming bready. Position your rack in the center of the oven; too high and the bottoms will be pale, too low and the tops won't get that gorgeous color. While the oven heats, tear off a sheet of parchment paper the size of your baking sheet and set it aside — trying to wrestle hot bones onto parchment mid-process is a recipe for burnt knuckles and creative cursing. The sizzle when these hit the pan? Absolute perfection.
- In a small bowl, mash together your softened butter, half the Parmesan, and a pinch of garlic powder until it forms a spreadable paste. This is the moment of truth — get in there with a fork and really work it until it's homogeneous. The mixture should smell like the best garlic bread you've ever encountered, but with the nutty depth that Parmesan brings to the party. Set this aside at room temperature; if it firms up too much, give it a quick 5-second zap in the microwave, but don't melt it completely or you'll lose that beautiful texture.
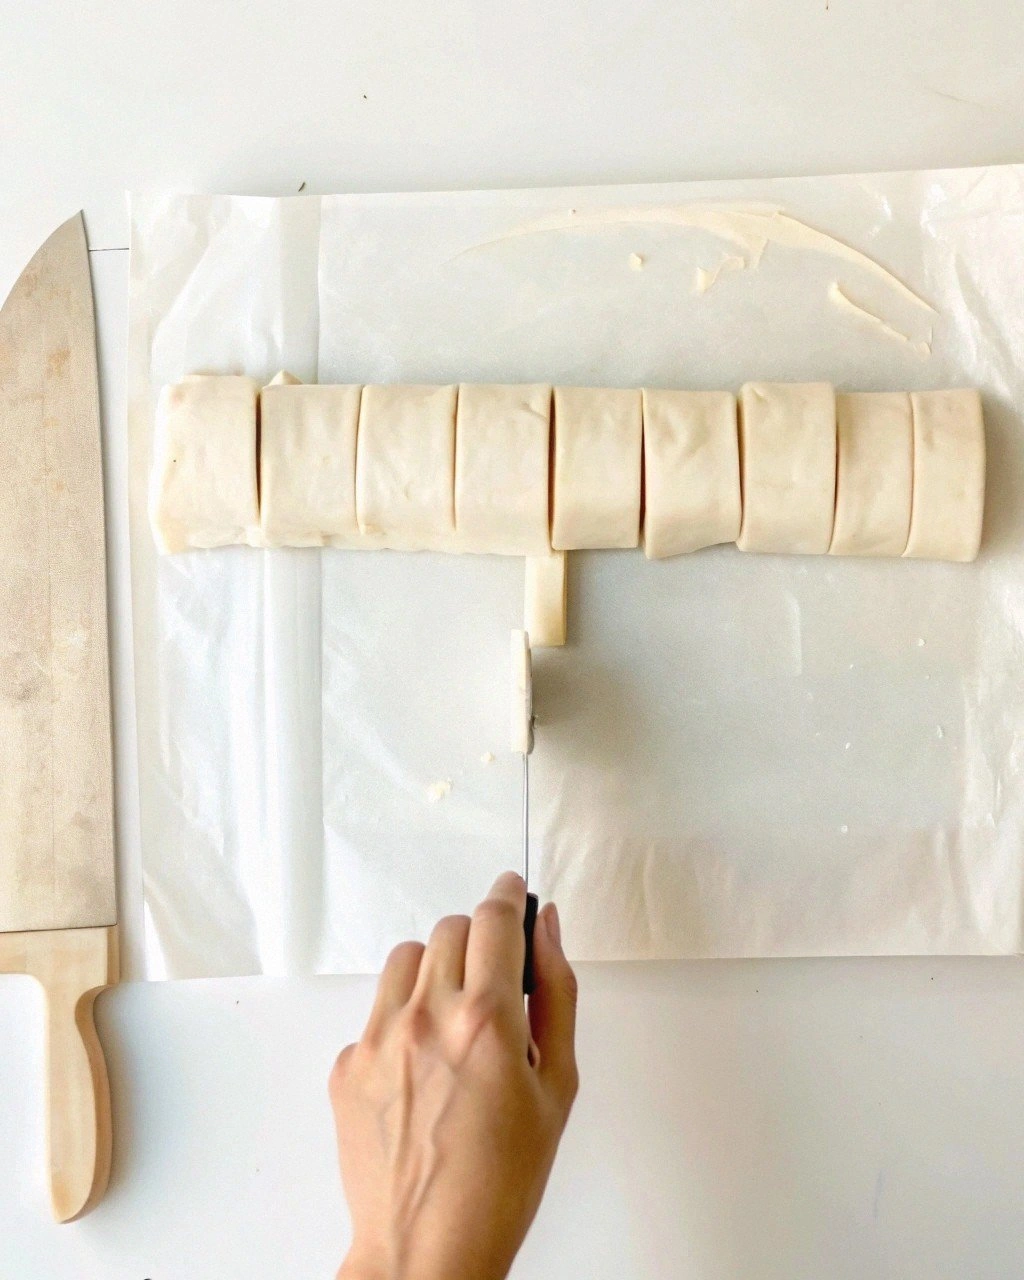
- Divide your pizza dough into 12 equal pieces — don't stress about perfect precision here, but try to keep them within the same ballpark size-wise. Working with one piece at a time, roll it between your palms into a rope about 8 inches long. Now here's the magic part: tie a loose knot in the center, then gently pull and twist to create the knobby joint sections. You want them to look like miniature femurs from a very small, very delicious skeleton. Place each shaped bone on your prepared parchment as you go, leaving about 2 inches between them for expansion.
- Using your thumb, press down in the center of each bone to create a shallow indentation — this is where the mozzarella will nestle. You want to go about halfway through the dough, creating a little cheese cave without punching all the way through. Think of it as creating a cozy bed for your cheese to snuggle into during baking. If the dough springs back, let it rest for 30 seconds and try again; sometimes it needs a moment to relax its gluten.
- Cut your mozzarella into 12 small cubes, about the size of a large pea each. Blot them gently with paper towel to remove excess moisture — this step is crucial for preventing soggy bone syndrome. Place one cube in each indentation, pressing down slightly so it's nestled in but still visible. The cheese should peek out just enough to create that dramatic reveal when people break them open.
- Now for the fun part — brush each bone generously with your butter-Parmesan mixture. Use a pastry brush and really get in there, making sure to coat all the nooks and crannies. The dough should look glossy and smell incredible. Reserve about a third of the mixture for a second brushing halfway through baking. This double-coating technique creates layers of flavor and ensures every bite delivers that buttery, cheesy punch.
- Sprinkle the remaining Parmesan over the top of each bone — don't be shy here. The cheese will melt and create little frico edges that shatter like candy glass when you bite into them. You want a light but complete covering, like a dusting of snow on a mountaintop, except this snow is made of pure umami gold. Any excess on the parchment will become crispy cheese chips that are cook's treat — consider them your reward for a job well done.
- Slide the parchment onto your baking sheet and into the oven for 12 minutes. Don't walk away from the oven here — this is where things get exciting. After 12 minutes, pull them out, brush with the remaining butter mixture, and rotate the pan for even browning. Back in for another 8-10 minutes until they're golden brown and the cheese is bubbling like a witch's cauldron. The edges should be deep golden, almost mahogany in spots, while the knuckles stay slightly lighter.
- Remove and let cool for exactly 5 minutes — no more, no less. Too short and the cheese will burn your mouth like molten lava, too long and you'll lose that perfect cheese pull for photos. Transfer to a serving platter and watch them disappear faster than candy on Halloween night. Serve with the marinara sauce for dipping, warmed slightly so it doesn't cool down your beautiful bones.
That's it — you did it. But hold on, I've got a few more tricks that'll take this to another level than you ever thought possible.
Insider Tricks for Flawless Results
After making approximately 847 batches of these bones (give or take), I've discovered some game-changing techniques that separate the merely good from the transcendent. These are the secrets I whisper to friends who want to achieve breadstick bone immortality.
The Temperature Rule Nobody Follows
Room temperature ingredients aren't just a suggestion — they're the difference between breadstick bones that look like they belong in a medical textbook versus ones that look like they came from a sad hospital cafeteria. When your dough is cold, it fights back against shaping, creating cracks and tears that ruin the skeletal aesthetic. Your butter needs to be pliable enough to cream but not so soft it turns into an oily mess — think cool room temperature, about 65°F. If you can press your finger into it and leave an impression without the butter squishing everywhere, you've hit the sweet spot. A friend tried skipping this step once — let's just say her bones looked like they'd been through a wood chipper, and not in a good way.
Why Your Nose Knows Best
Trust your sense of smell more than your eyes when determining doneness — when these bones are perfectly baked, your kitchen will smell like the best Italian restaurant in town had a baby with a haunted house. The aroma should be nutty, buttery, and slightly sweet, with just a hint of caramelization that makes your mouth water involuntarily. If you start smelling something that reminds you of burnt popcorn, you've gone too far and need to rescue them immediately. This next part? Pure magic — that moment when the smell hits its peak is exactly when you should pull them out, regardless of what they look like.
The 5-Minute Rest That Changes Everything
I know it's tempting to tear into these immediately — believe me, I've burnt my tongue more times than I care to admit — but those five minutes of resting time are crucial for achieving the perfect texture. During this rest, the cheese sets slightly, moving from molten lava to that perfect Instagram-pull consistency. The exterior stays crispy while the interior relaxes, creating that contrast that makes these so addictive. Plus, the carryover cooking finishes baking the very center without over-browning the outside. If you've ever struggled with cheese that runs out like a river, leaving you with hollow bones, this is your solution.
The Secret Weapon Seasoning
Here's what separates my bones from everyone else's: a tiny pinch of smoked paprika in the butter mixture. Not enough to make them taste like barbecue — just enough to add depth and mystery, like they've been kissed by the ghost of a thousand campfires. It enhances the butter's richness and makes the Parmesan taste even nuttier. Start with just a pinch for the whole batch; you want people to taste something special but not be able to put their finger on what it is. This is the kind of trick that has guests saying "these are amazing" instead of just "these are good."
The Cheese Pull Photography Moment
If you're not planning to Instagram these, you're missing out on serious social media gold. The key to the perfect cheese pull shot happens at exactly 3-4 minutes after they come out of the oven. Too soon and the cheese runs like a waterfall, too late and it breaks instead of stretching. Break one in half slowly, letting the cheese stretch naturally, and have someone ready with their camera. The cheese should stretch at least 6 inches before breaking — if it doesn't, you need more mozzarella in the next batch. Natural light from a window works best; artificial light makes melted cheese look like plastic.
Creative Twists and Variations
This recipe is a playground. Here are some of my favorite ways to switch things up when you want to keep the spooky spirit but explore new flavor territories:
The Everything Bagel Bones
Swap out the Parmesan for everything bagel seasoning mixed into the butter, creating bones that taste like your favorite breakfast had a spooky makeover. The garlic, onion, and sesame seeds create incredible texture while the poppy seeds look like little bone freckles. Use cream cheese instead of marinara for dipping — it's unexpected but absolutely addictive. These disappear faster at brunch parties than actual everything bagels, which is saying something.
The Pizza Bones
Add a tiny cube of pepperoni with the mozzarella for bones that taste like the best pizza you've ever had. Brush with garlic butter mixed with Italian herbs — oregano, basil, and a pinch of red pepper flakes for heat. Serve with warm pizza sauce spiked with a splash of balsamic vinegar for dipping. Kids go absolutely bananas for these, and adults pretend they're too sophisticated until they try one and immediately turn into children.
The Truffle Shuffle Bones
Add a few drops of truffle oil to your butter mixture for bones that taste like they cost $25 at an upscale restaurant. Use a mix of Parmesan and Pecorino Romano for extra complexity. These are dangerously good — the kind of thing you make for date night and then spend the whole evening talking about instead of actually dating. Serve with a simple garlic aioli instead of marinara to keep the focus on the truffle flavor.
The Sweet and Savory Bones
This sounds weird but stay with me here — add a whisper of honey to your butter mixture. The sweet-savory combination is absolutely addictive, especially if you finish with a sprinkle of flaky sea salt right when they come out of the oven. The honey helps the bones caramelize to a deeper color and creates little sticky spots that are like edible candy. Serve these with a side of warm spiced apple butter for dipping — it's like Halloween and Thanksgiving had a delicious baby.
The Buffalo Bones
Mix Buffalo wing sauce into your butter for bones with serious kick. Use blue cheese crumbles on top instead of Parmesan for that authentic wing experience. These are perfect for game day Halloween parties when you want to combine two celebrations into one. Serve with ranch or blue cheese dressing for cooling relief, because these pack serious heat that builds with each bone you eat.
The Breakfast Bones
Add cooked, crumbled breakfast sausage to the center with the mozzarella, creating bones that taste like the best breakfast sandwich you've ever had. Use maple butter instead of garlic butter for a sweet-savory combination that works surprisingly well. These are incredible for Halloween morning parties or when you want breakfast for dinner with a spooky twist. The maple creates amazing caramelization that makes these smell like a haunted pancake house in the best possible way.
Storing and Bringing It Back to Life
Let's be real — these are best fresh from the oven when the cheese is still molten and the exterior crackles like autumn leaves underfoot. But life happens, parties end, and sometimes you need to resurrect these bones from their cooled state.
Fridge Storage
Store completely cooled bones in an airtight container with parchment paper between layers — they'll keep for up to 3 days in the refrigerator. The key is letting them cool completely before storage; trapping steam creates condensation that turns your crispy bones into soggy disappointments. Don't use plastic wrap directly on the bones — it creates a humid environment that kills the crunch faster than a vampire at a garlic festival. Instead, use a container with a tight-fitting lid and a paper towel on the bottom to absorb any excess moisture.
Freezer Friendly
These freeze beautifully for up to 2 months — flash freeze them on a baking sheet first, then transfer to freezer bags with as much air removed as possible. Separate layers with parchment paper to prevent them from becoming one giant bone blob. Label with the date because frozen breadstick bones look suspiciously like frozen fish sticks, and you don't want to surprise anyone expecting fish with cheesy Halloween treats. The best part? You can reheat them directly from frozen, making spontaneous spooky snacking totally achievable.
Best Reheating Method
Add a tiny splash of water before reheating — it steams back to perfection. Reheat in a 350°F oven for 8-10 minutes directly from the fridge, or 12-15 minutes from frozen. The water creates just enough steam to re-crisp the exterior without drying out the interior. Skip the microwave unless you enjoy rubbery cheese and sad, limp bones. If you're in a hurry, a toaster oven works in a pinch — just watch them closely because they go from perfect to burnt faster than you can say "trick or treat."