I was standing in my kitchen, staring at a half‑finished stir‑fry that looked more like a sad, soggy mess than the Thai masterpiece I’d promised my friends. The garlic had burnt, the sauce was thinner than water, and I could hear my roommate’s stomach growl like a distant thunderstorm. I dared myself to turn that disaster into a triumph, and after a frantic dash to the pantry, I discovered a handful of hidden gems: tempura flour for that perfect crunch, and a dash of Thai chili paste that would make any street vendor jealous. That moment of panic turned into the spark for what I now call the ultimate Thai Cashew Chicken – a dish that can be whipped up in just 30 minutes and will have you shouting, “I dare you to taste this and not go back for seconds!”
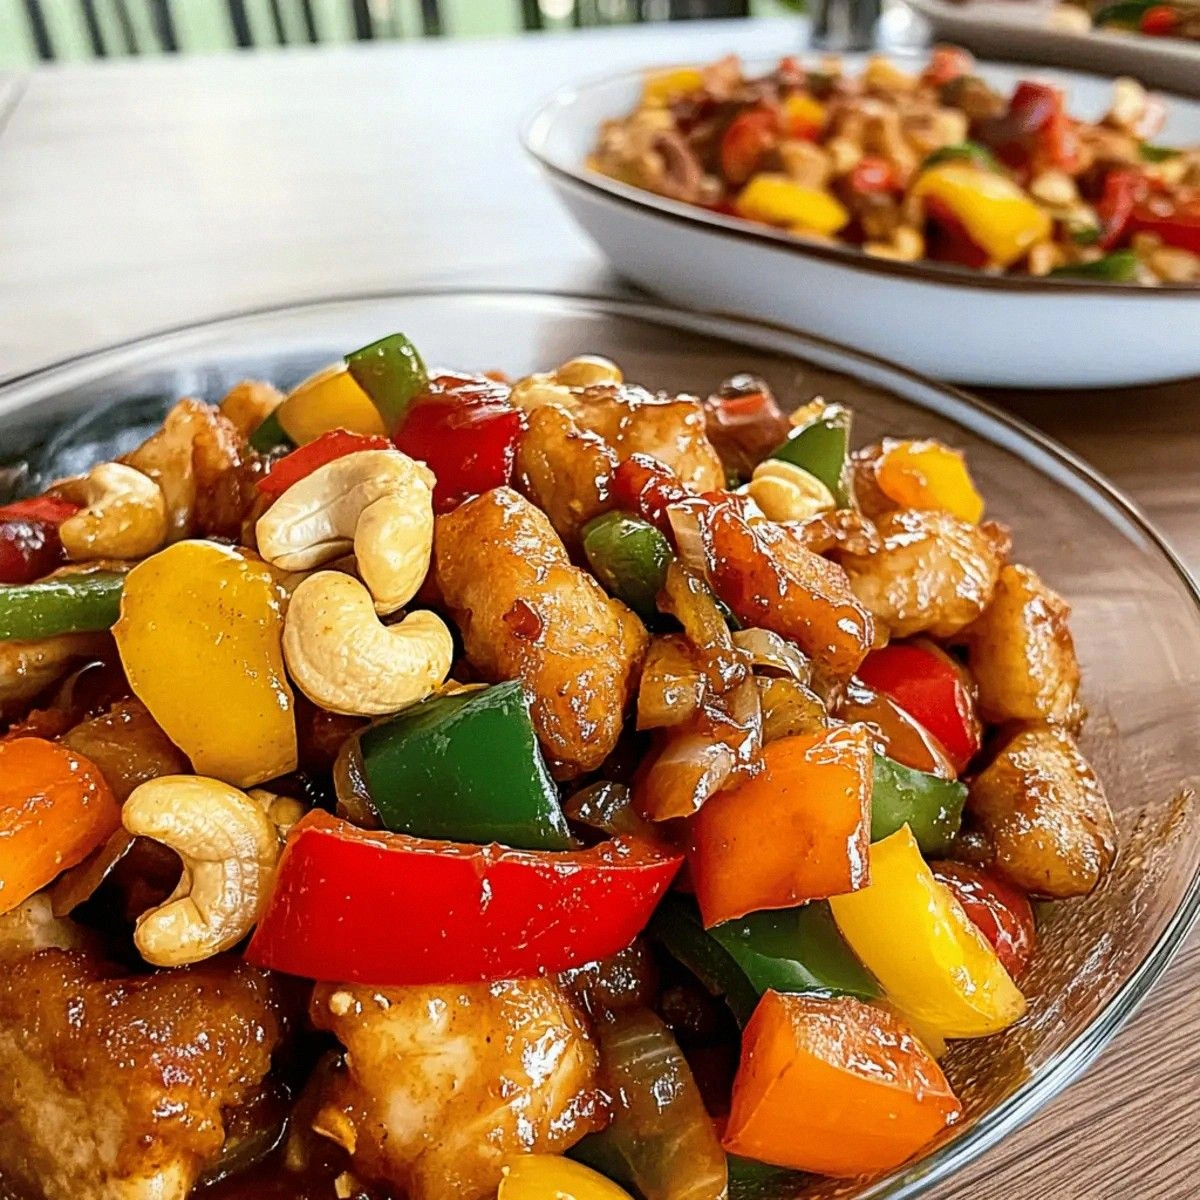
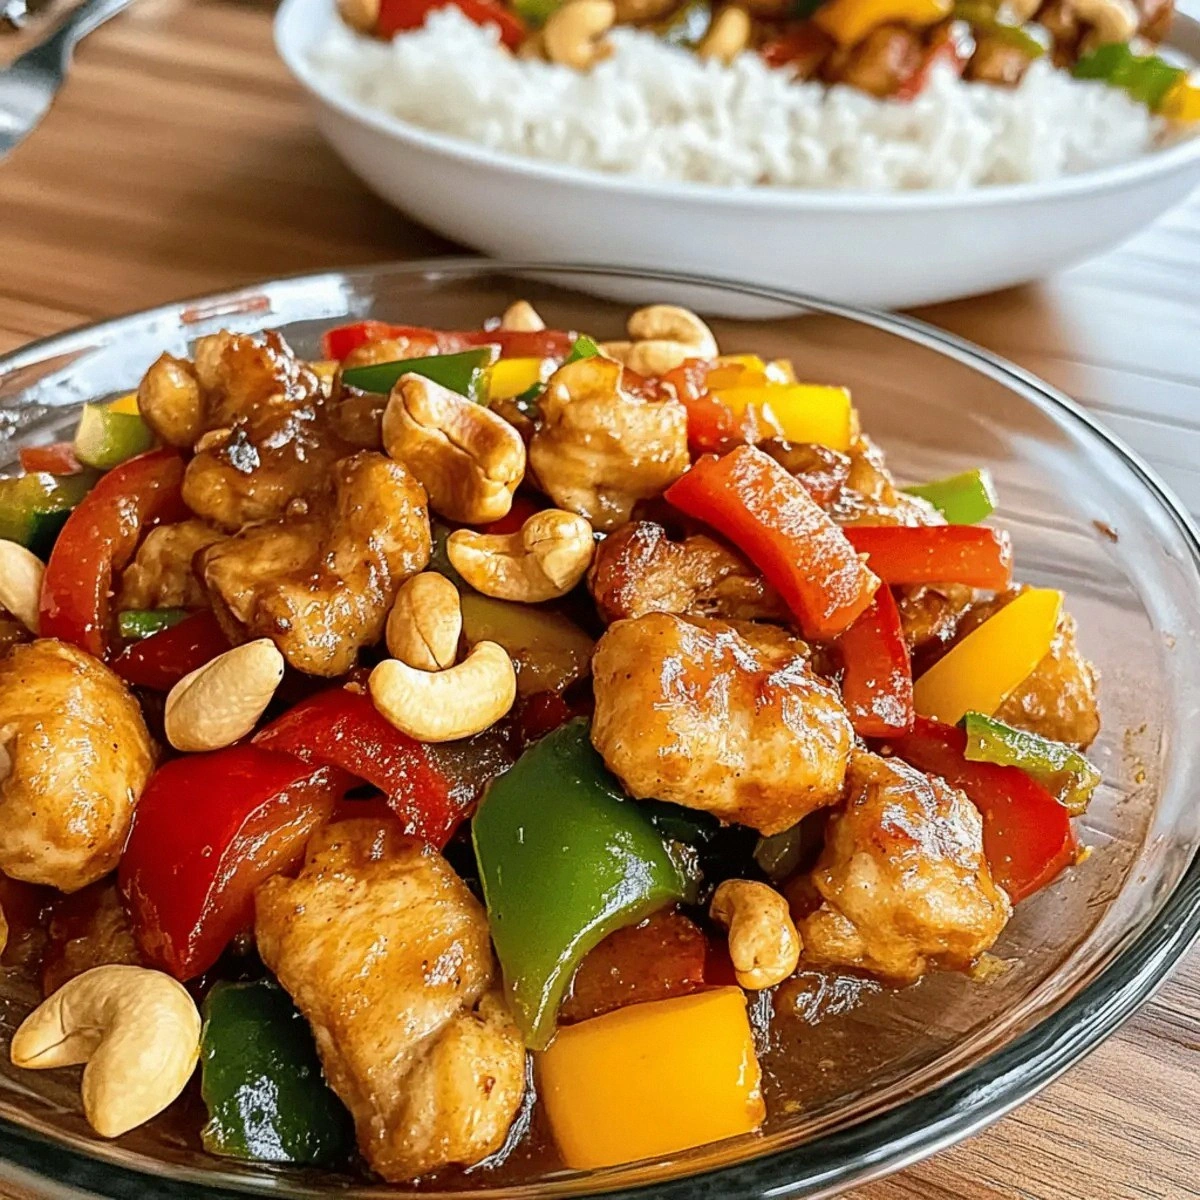
Picture this: the kitchen fills with the intoxicating aroma of sizzling garlic and chilies, a fragrant cloud that wraps around you like a warm hug. The sizzling sound is a steady, confident pop‑pop‑pop that tells you the oil is hot enough to seal in flavor. When the chicken hits the pan, it browns with a caramelized crust that crackles like fireworks, while the cashews toast to a golden hue, releasing a buttery nuttiness that makes the air feel like a tropical market. The sauce, glossy and thick, clings to each piece of chicken like velvet, delivering a perfect balance of sweet, salty, and spicy that dances on the palate.
What makes this version truly stand out is a secret technique I stumbled upon: coating the chicken in a light tempura flour dust before the quick sear. Most recipes either skip the coating or drown the chicken in a heavy batter, resulting in a soggy mess. This thin veil of tempura flour creates a delicate crunch that holds up against the saucy goodness, giving you that satisfying bite without the heaviness. And let’s not forget the humble green onion – sliced just right, it adds a fresh, peppery pop that cuts through the richness, keeping the dish lively and bright.
I’ll be honest — I ate half the batch before anyone else got a chance to try it, and that’s because the flavors are that addictive. Most recipes get the sauce wrong, either too thin or overly sweet, but this one hits the sweet spot with just the right amount of sugar, soy, and oyster sauce, all balanced by the heat of Thai chili paste. The result? A dish that’s hands down the best version you’ll ever make at home, and it’s so simple that even a kitchen rookie can nail it. Let me walk you through every single step — by the end, you’ll wonder how you ever made it any other way.
What Makes This Version Stand Out
- Crunch Factor: The tempura flour coating gives each bite a light, airy crunch that shatters like thin ice, keeping the chicken juicy underneath.
- Flavor Balance: A precise blend of oyster sauce, light soy, and a whisper of sugar creates a sweet‑salty harmony that sings louder than a choir.
- Heat Control: Thai chili paste delivers a clean, lingering heat without overwhelming the other flavors, perfect for those who love a gentle burn.
- Texture Play: The contrast between tender chicken, buttery cashews, and crisp bell peppers makes every forkful an adventure.
- Speed: From prep to plate in just 30 minutes, this recipe proves you don’t need hours to create restaurant‑quality Thai food.
- Versatility: Simple enough for weeknight meals, yet impressive enough to wow guests at a dinner party.
- Ingredient Integrity: Using fresh, high‑quality cashews and real Thai chili paste ensures authentic flavor without shortcuts.
- Make‑Ahead Potential: The sauce can be pre‑made and stored, cutting your cooking time in half for future meals.
Inside the Ingredient List
The Flavor Base
The heart of this dish beats with garlic, Thai chili paste, oyster sauce, and light soy sauce. Garlic, when minced finely, releases a pungent aroma that instantly awakens the senses; if you skip it, the dish loses its aromatic backbone. Thai chili paste is the secret weapon, delivering a smoky heat that’s not just about spice but depth. Oyster sauce adds umami richness, while light soy sauce brings a subtle saltiness without darkening the sauce. If you’re out of Thai chili paste, a mix of sriracha and a pinch of fish sauce can mimic the flavor profile.
The Texture Crew
Tempura flour and cashew nuts are the dynamic duo that give this dish its signature crunch. Tempura flour, unlike regular flour, is lighter because it contains a blend of wheat and rice flour, creating a crisp veil that stays crunchy even after the sauce coats it. Cashews, when toasted just right, become buttery and slightly sweet, adding a luxurious mouthfeel. Skipping the cashews? You’ll miss that delightful surprise of nutty crunch that makes each bite memorable. For a nut‑free version, try toasted pumpkin seeds for a similar texture.
The Unexpected Star
Green onions and dried chilies might seem like garnish, but they’re the finishing touches that elevate the dish. Green onions add a fresh, oniony bite that cuts through the richness, while dried chilies infuse a smoky heat that lingers on the palate. If you over‑cook the green onions, they lose their snap and become limp; add them at the very end for that perfect pop. For a milder version, remove the seeds from the dried chilies, or substitute with a pinch of smoked paprika.
The Final Flourish
A splash of water, a pinch of white sugar, and a drizzle of oil bring everything together. Water helps the sauce achieve the perfect glossy consistency, while sugar balances the saltiness of the soy and oyster sauces. The oil, both as needed and the measured 2 tbsp, ensures the chicken sears without sticking and the vegetables stay vibrant. If you use too much oil, the dish becomes greasy; if you use too little, the chicken will stick and lose its crust. Opt for a neutral oil like grapeseed for the best high‑heat performance.
Everything's prepped? Good. Let's get into the real action...
The Method — Step by Step
First, slice the chicken into bite‑size strips, then pat them dry with paper towels. The drier the chicken, the better the tempura coating will adhere. Toss the strips in a shallow bowl of tempura flour, shaking off any excess. This light dust creates a delicate veil that will crisp up beautifully in the pan. Power transition: Okay, ready for the game‑changer?
Heat a large wok or skillet over medium‑high heat and add 2 tbsp of oil. When the oil shimmers, it’s ready – you’ll see a tiny ripple when you flick a drop of water into it. Carefully lay the coated chicken pieces in a single layer; you should hear a confident sizzle that says, “We’re on the right track.” Let the chicken sear undisturbed for about 2‑3 minutes, allowing the edges to turn golden brown and start pulling away from the pan.
While the chicken cooks, mince the garlic and slice the onion and bell peppers into thin strips. The thinner you cut, the quicker they’ll soften, preserving that satisfying snap. Set the green onions aside, separating the white parts from the green tops – the whites will go in early, the greens will finish the dish.
Once the chicken is beautifully browned, remove it from the wok and set aside on a plate. Drain any excess oil, leaving just enough to coat the wok’s surface. This step is crucial: too much oil will make the sauce greasy, too little and the veggies will stick. Watch Out: If you leave the chicken in the hot oil too long, it will over‑cook and become tough.
Add the minced garlic to the wok and stir‑fry for about 20 seconds until fragrant – you’ll hear a subtle pop and the aroma will lift instantly. Then, toss in the sliced onion and bell peppers, stirring constantly. The vegetables should stay crisp‑tender, their colors brightening like a sunrise. Sprinkle in the dried chilies, letting them release their smoky heat into the oil.
Now, combine the sauce ingredients: Thai chili paste, oyster sauce, light soy sauce, white sugar, and water. Stir everything together in a small bowl until the sugar dissolves. Pour the mixture into the wok, letting it bubble and thicken; you’ll see it coat the veggies in a glossy sheen. Return the chicken to the pan, tossing everything together so each piece is enveloped in that luscious sauce.
Add the cashew nuts and the white parts of the green onions, giving them a quick toss to warm through. The nuts should become fragrant, their buttery flavor marrying with the sauce. Finally, sprinkle the green tops of the onions over the dish, letting the residual heat wilt them just enough to release their fresh bite without losing color.
Give the whole pan a final stir, making sure the sauce clings to every ingredient like a silk scarf. Taste and adjust seasoning if needed – a splash more soy or a pinch of sugar can fine‑tune the balance. Serve immediately over steamed jasmine rice or noodles, and watch as your guests’ eyes widen with anticipation. And now the fun part: garnish with a few extra cashews for crunch and a drizzle of fresh lime juice for a bright finish.
That's it — you did it. But hold on, I've got a few more tricks that'll take this to another level...
Insider Tricks for Flawless Results
The Temperature Rule Nobody Follows
Keep your wok hot enough that the chicken sizzles the moment it contacts the surface. If the temperature drops, the coating will absorb oil and become soggy. A good test is to flick a few drops of water into the oil; they should dance and evaporate instantly. I once tried cooking on low heat and ended up with a greasy, limp mess – never again.
Why Your Nose Knows Best
Your sense of smell is the ultimate timer. When the garlic turns golden and fragrant, you know it’s time to add the veggies. If you wait too long, the garlic will burn and turn bitter; if you add them too early, the veggies will lose their crunch. Trust that aromatic cue – it’s more reliable than any kitchen timer.
The 5‑Minute Rest That Changes Everything
After the chicken is cooked and before you toss it with the sauce, let it rest for five minutes. This short pause lets the juices redistribute, keeping the meat tender and juicy. Skipping this step can result in dry chicken that sucks the flavor out of the sauce. I once rushed this and the dish felt flat – a simple rest makes all the difference.
Cashew Toasting Secrets
Toast the cashews in a dry pan over medium heat for just two minutes, shaking the pan constantly. You’ll hear a gentle crackle and see them turn a deeper golden hue. This step amplifies their buttery flavor and adds a subtle smoky note that pairs perfectly with the spicy sauce. If you skip it, the nuts remain bland and won’t contribute that extra layer of depth.
Sauce Consistency Control
If your sauce looks too thin, let it simmer uncovered for an extra minute; the water will evaporate, thickening the glaze. Conversely, if it’s too thick, a splash of chicken broth or extra water will loosen it without diluting flavor. This flexibility ensures the sauce clings to each piece like a silk ribbon.
Creative Twists and Variations
This recipe is a playground. Here are some of my favorite ways to switch things up:
Coconut Curry Cashew Chicken
Swap the Thai chili paste for a tablespoon of red curry paste and add a half cup of coconut milk. The result is a richer, creamier sauce with a subtle sweetness that pairs beautifully with the cashews. Perfect for those who love a mellow heat and a tropical vibe.
Spicy Peanut Twist
Add two tablespoons of creamy peanut butter to the sauce, and increase the dried chilies for extra heat. This creates a nutty, velvety coating reminiscent of classic Thai peanut dishes, while still retaining the crunch of the cashews.
Vegetarian Delight
Replace the chicken with firm tofu cubes, dusted in the same tempura flour. The tofu absorbs the sauce wonderfully, and the dish stays just as satisfying. Pair with extra veggies like snap peas or carrots for added color.
Crispy Bacon Boost
Crumble a few strips of cooked bacon into the pan just before adding the sauce. The smoky bacon adds a depth of flavor that makes the dish feel indulgent, while the crisp bits mingle with the cashews for an ultimate crunch.
Lemon‑Ginger Zing
Stir in a teaspoon of freshly grated ginger and finish with a squeeze of lemon juice right before serving. The ginger adds a bright, peppery bite, and the lemon lifts the whole dish, making it feel lighter and more refreshing.
Storing and Bringing It Back to Life
Fridge Storage
Allow the dish to cool to room temperature, then transfer it to an airtight container. It will keep nicely for up to three days in the refrigerator. When reheating, add a splash of water or broth to revive the sauce’s glossy sheen.
Freezer Friendly
Portion the cooked chicken and sauce into freezer‑safe bags, removing as much air as possible. Freeze for up to two months. Thaw overnight in the fridge, then reheat in a skillet with a drizzle of oil; the cashews may lose some crunch, so toss in a handful of fresh ones at the end.
Best Reheating Method
The stovetop is king. Heat a non‑stick pan over medium heat, add a teaspoon of oil, and stir‑fry the leftovers for 3‑4 minutes, adding a teaspoon of water to steam the sauce back to life. Avoid the microwave if you can; it makes the cashews soggy and the sauce rubbery.