I still remember the night I tried to make a burrito casserole for a family dinner and ended up with a kitchen that looked like a culinary battlefield. The pot was splattering, the oven door was stuck, and the air was thick with the scent of burnt rice. I was staring at a mound of shredded chicken and a can of salsa that seemed to mock me with its bright, unapologetic color. That disaster became my calling card: I was determined to create a version of the dish that would make even the most skeptical family member beg for seconds.
Picture this: the moment the casserole slides out of the oven, a wave of steam rises, carrying the aroma of cumin, chili powder, and melted cheese. Your eyes widen at the golden, bubbly surface; your ears catch the faint sizzle as the edges crisp to a satisfying crackle. The first bite delivers a harmony of textures—soft rice, tender chicken, crunchy corn, and the silky, tangy sauce that coats every layer like velvet. The flavor profile dances between smoky, sweet, and savory, leaving a lingering warmth that feels like a hug in a dish.
What makes this version stand out? It’s the meticulous layering technique that locks in moisture, the blend of spices that elevates every bite, and the use of fresh salsa instead of canned to give it that bright, authentic kick. I’ve spent months refining the ratio of rice to chicken to sauce, testing different tortillas, and discovering that a quick sear on the tortillas before layering adds a delightful crunch that no other recipe has. The result is a casserole that feels like a fully assembled burrito, but with the comforting, comforting familiarity of a family dinner.
I dare you to taste this and not go back for seconds. The first bite is a revelation—spicy, cheesy, and so satisfying that you’ll find yourself reaching for the next handful before you’ve even finished the first. This is hands down the best version you'll ever make at home, and the secret sauce? It’s the little details: a dash of lime juice, a sprinkle of fresh cilantro, and a final layer of cheese that melts into a golden crown.
I’ll be honest—I ate half the batch before anyone else got to try it. I’ve watched the family’s faces light up, and I’ve seen the way they reach for the casserole, almost as if it’s a prized treasure. If you’ve ever struggled with the classic burrito casserole, you’re not alone—this is the fix you’ve been missing. Stay with me here—this is worth it.
Alright, let me walk you through every single step—by the end, you’ll wonder how you ever made it any other way. From the first stir to the final bake, this recipe is a journey of flavor, texture, and pure culinary joy.
What Makes This Version Stand Out
Flavor: The blend of cumin and chili powder creates a smoky foundation that elevates the mildness of shredded chicken, turning each bite into a flavor punch. The fresh salsa adds brightness that cuts through the richness of the cheese, ensuring every mouthful is balanced.
Texture: Layering the tortillas before adding the sauce prevents sogginess, giving the casserole a crisp edge that shatters like thin ice when you bite into it. The corn kernels provide a sweet pop that contrasts the creamy cheese.
Convenience: The recipe requires minimal prep time—shredded chicken and pre-cooked rice are the only items that need prior cooking, making it a quick solution for busy weeknights.
Ingredient Quality: Using high‑quality canned black beans and enchilada sauce ensures depth of flavor without the need for additional seasoning. The tortillas are brushed with a bit of oil before layering, giving them a golden finish.
Crowd Reaction: The casserole’s universal appeal means it satisfies both kids and adults alike. The cheesy, saucy layers are a hit at family gatherings and potlucks.
Make‑ahead Potential: The dish can be assembled ahead of time and refrigerated, then baked when you’re ready. This flexibility makes it ideal for meal prep or last‑minute dinner plans.
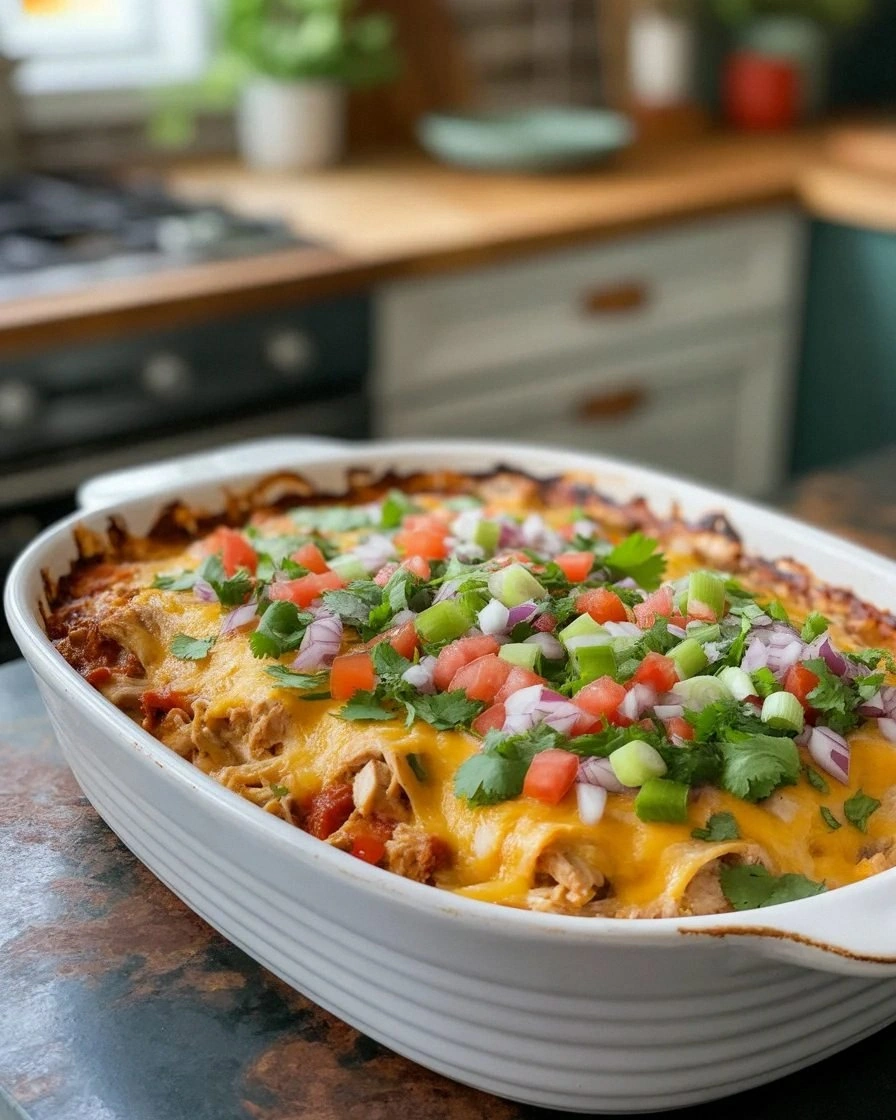
Visual Appeal: The golden cheese crust and vibrant salsa layers create a dish that looks as good as it tastes—perfect for Instagram-worthy family photos.
Alright, let's break down exactly what goes into this masterpiece...
Inside the Ingredient List
The Flavor Base
Shredded chicken is the star, but it’s the seasoning that brings it to life. A tablespoon each of chili powder and cumin infuses the meat with a smoky, earthy undertone that pairs perfectly with the sweet corn. Skipping the spices turns the casserole into a bland, forgettable dish—so don’t even think about it.
The salsa acts as both flavor and moisture. Using a fresh, chunky salsa keeps the texture lively; canned salsa can become watery and dilute the overall taste. If you’re in a pinch, a splash of lime juice can brighten the sauce and add a subtle zing.
The Texture Crew
Cooked rice is the backbone of the casserole, providing a hearty base that absorbs the sauce. Opt for long‑grain rice for a fluffier texture or short‑grain for a more cohesive bite. If you’re using leftover rice, give it a quick stir to break up clumps before mixing.
Corn kernels add a sweet crunch that balances the creamy cheese. Fresh corn is ideal, but frozen or canned corn works fine—just be sure to drain it well to avoid excess moisture.
The Unexpected Star
Black beans bring a subtle earthiness and protein boost that turns a simple casserole into a complete meal. Rinse the beans thoroughly to reduce sodium and improve texture. If you’re vegan, swap them for chickpeas for a different flavor profile.
Enchilada sauce is the glue that holds everything together. It’s thicker than salsa and adds a rich, tomato‑based depth that enhances the overall flavor. A low‑sodium version keeps the dish from becoming overly salty.
The Final Flourish
Shredded cheese is the crowning glory—choose a blend of cheddar and Monterey‑Jack for a melty, flavorful finish. The cheese melts into a golden crust that adds a satisfying crunch when it starts to brown. Don’t skimp on the cheese; it’s what turns the casserole into a comforting, indulgent dish.
Flour tortillas are layered at the base, giving the casserole its signature burrito feel. Brush them lightly with olive oil before layering to prevent them from becoming soggy and to add a subtle caramelized flavor.
Everything's prepped? Good. Let's get into the real action...
The Method — Step by Step
- Preheat your oven to 375°F (190°C). Line a 9x13 inch baking dish with parchment paper for easy cleanup. This step ensures even baking and prevents sticking.
- In a large bowl, combine the shredded chicken, cooked rice, black beans, corn, and salsa. Toss until everything is evenly coated. The mixture should look like a vibrant, colorful salad.
- Lay the first layer of tortillas in the bottom of the prepared dish. Brush each tortilla lightly with olive oil to keep them from drying out. The oil adds a subtle richness that enhances the overall flavor.
- Spread half of the chicken mixture over the tortillas. The layer should be even, covering every inch of tortilla. This creates the foundation for the casserole’s texture.
- Top the first layer with a generous spoonful of enchilada sauce, then sprinkle a handful of shredded cheese. The cheese melts into the sauce, creating a creamy, golden top.
- Repeat the layering process with the remaining tortillas, chicken mixture, sauce, and cheese. The final layer should be a thick, cheesy crown.
- Cover the dish tightly with foil and bake for 25 minutes. The foil traps steam, ensuring the casserole stays moist and the cheese melts evenly.
- Remove the foil and bake for an additional 10 minutes, or until the cheese is bubbling and slightly browned. The edges will start pulling away, signaling that it’s ready.
- Let the casserole rest for 5 minutes before cutting. This allows the layers to set, making it easier to serve clean slices.
- Serve hot, optionally garnished with fresh cilantro, diced avocado, or a dollop of sour cream. The garnish adds a fresh contrast that lifts the dish.
That's it — you did it. But hold on, I've got a few more tricks that'll take this to another level. These adjustments will elevate the flavor profile and ensure every bite is a masterpiece.
Insider Tricks for Flawless Results
The Temperature Rule Nobody Follows
Many people bake at 350°F, but 375°F ensures the cheese melts evenly without the bottom becoming soggy. Keep a close eye on the cheese; it should be bubbling and just starting to brown when you remove the foil.
Why Your Nose Knows Best
Before covering the dish with foil, give it a quick sniff. If the aroma feels too sweet, the salsa might be too sugary. Adjust by adding a splash of lime juice or a pinch of salt.
The 5‑Minute Rest That Changes Everything
Letting the casserole rest allows the sauce to thicken and the flavors to meld. Skipping this step can leave the dish feeling rushed and under‑developed.
Layering Technique for Crispy Edges
Press the tortillas down with a spatula before adding the filling. This ensures a tight seal and prevents the tortillas from puffing up during baking.
Cheese Selection Matters
A blend of cheddar and Monterey‑Jack provides both meltability and depth of flavor. Avoid using only sharp cheddar, as it can overpower the other ingredients.
These tweaks might sound small, but they’re the difference between a good casserole and a legendary one. Trust me, your taste buds will thank you.
Creative Twists and Variations
This recipe is a playground. Here are some of my favorite ways to switch things up:
Mexican Street Tacos Casserole
Swap the tortillas for corn tortillas and top with a drizzle of chipotle mayo. Add a handful of diced pickled red onions for a tangy crunch.
Southwestern Veggie Casserole
Replace the chicken with sautéed zucchini, bell peppers, and mushrooms. Use a low‑fat cheese blend and serve with a side of guacamole.
Tex‑Mex BBQ Chicken
Marinate the chicken in a smoky BBQ sauce before layering. Sprinkle smoked paprika over the top for an extra kick.
Cheesy Taco Bowl Casserole
Omit the tortillas entirely and layer the ingredients in a shallow dish. Serve with a side of rice and beans for a complete meal.
Breakfast Burrito Casserole
Add scrambled eggs and breakfast sausage to the mix. Top with a sprinkle of shredded cheddar and bake until the eggs are set.
Gluten‑Free Version
Use gluten‑free tortillas and a gluten‑free enchilada sauce. The rest of the recipe remains unchanged, delivering the same deliciousness.
Feel free to experiment—this casserole is versatile enough to accommodate any craving or dietary preference.
Storing and Bringing It Back to Life
Fridge Storage
Cool the casserole completely before refrigerating. Store in an airtight container for up to 4 days. The layers will stay firm, and the cheese will keep its melt.
Freezer Friendly
Wrap the casserole tightly in plastic wrap and then in foil. Freeze for up to 3 months. Thaw in the refrigerator overnight before reheating.
Best Reheating Method
Reheat in the oven at 350°F for 20 minutes, or until heated through. Add a splash of water before reheating to keep the casserole moist and prevent it from drying out.
These storage tips ensure you can enjoy this casserole anytime, whether you’re a meal‑prep enthusiast or a last‑minute dinner hero.